
@moderator
Forum Replies Created
-
AuthorPosts
-
 ModeratorKeymaster
I captured another image of a swim ladder mounted on a Nic 38 stern (As shown by seller when Glennie hull #120 was for sale).

Same idea as Jeff’s – custom standoffs to hold ladder out from stern.
Marilyn, moderator
ModeratorKeymasterBent emailed me to say the purchase is complete – he now owns hull #120, formerly named Glennie, to be renamed Elmer. His homeport will be Kolding in Denmark.
Elmer is in great condition, based on the pictures that you can see here (until the seller takes them down.)
Marilyn, moderator
ModeratorKeymasterJeff of Sea Eagle (formerly Lady Jane K) sent me this photo showing the stern swim ladder that the PO installed.
 .
I notice that the stern rail has also been modified so there is a gate. Interesting idea – but with out Monitor wind vane and other accessories hanging of the stern, that won’t work for us.Thanks for sending Jeff. This is helpful.
ModeratorKeymasterOur hatches were badly crazed, so we took out the plexiglass and had a local supplier cut us new ones. Now our hatch frames still look rough, and one of our fore-hatch hold-up legs failed too – but with the new glass installed, they are fully functional – and we didn’t have to go through the pain of trying to remove all those corroded screws that hold the hatch to the deck.
Prior to replacing the glass, I looked at replacing the entire hatch with one in my price range (e.g. lewmar ocean series rather than something custom). After some studying of the current offerings, I decided that the original hatches are solidly constructed, so why replace them? Sure it would be nice to have dogs that tighten easier, and a two hold-up legs rather than one – but we would rather spend more time sailing in the good weather than struggle on the deck trying to get out those corroded screws….
Marilyn and VanModeratorKeymasterHi Darren –
The PO converted our aft cabin to one berth on the port side (oriented fore/aft). On the starboard side there are built-in drawers oriented fore/aft, with a bookshelf along the starboard hull. There is a seat just fwd of the bookshelf, so it makes a comfy second cabin for one person.
The berth can sleep two very friendly people, provided neither are claustrophobic. The forward wide end of the berth is about 50″ while the aft end is closer to 20″. The outer port side of the berth is under the deck, so there is not much height above the person along the hull. The berth is more pleasant for one person.
The aft sink was removed, and in its place is a little cabinet. The aft head was also removed – we now use the area as a hanging locker and tool storage.
Sorry, no photos available to show this aft cabin conversion.
When we are not underway, we sleep in the v-berth, which we converted to one large berth. This is a noisy area, being close to the chain locker and the mast – but it is a comfortable sleeping area for us.
If you want to see some various layouts, check out this posting that explains how to get a CD that has copies of drawings used for various layouts that CN delivered to customers.
Hope that helps –
MarilynModeratorKeymasterAs of 22nd Nov 2015, Legong is still available. Alan says inside she is almost new, just the outside needs some TLC.
Marilyn, moderator
ModeratorKeymasterJ-G says this Nic is sold – Moderator.
ModeratorKeymasterGerard says this Nic is sold – Moderator.
ModeratorKeymasterWe’re thousands of miles from our boat too – but have you checked whether the Neco manuals on the Equipment page offer anything helpful?
Marilyn
ModeratorKeymasterHi Trevor –
We had to replace our unit last year. I’m not sure if it was original or not, so unsure if it is like yours.
We had an Alder-Barbour compressor under the galley counter, with refrigeration lines running under the cooker and then to the CN-installed ice box. We removed the compressor and refrigeration unit from the ice box, and kept the ice box.
We replaced with a Isotherm ASU 3901, which has a holding plate and a really dumb “smart” controller. (We gave up on using the “smart” part and just manually control the setpoint based on our house battery state of charge.)
The isotherm has a Danfoss compressor, which is very good. It is much smaller than the original, so we relocated the compressor to under the ice box (right against the hull, not in the seat locker) in an area that was previously not used. To ensure good air cooling, we ran a rigid aluminium tube from the air grate we have aft of that seat locker and up to the air intake on the compressor. The air outlet blows out the air grate directly under the ice box. (Neither of these air outlets were used by our previous installation, so I suspect our 1980-installed Alder-Barbour unit was not original.)
Van had to remove the walls of the doored cabinet just forward of the icebox to install the new refrigeration lines. With much cursing, he got the interior of the cabinet apart piece by piece, without having to do anything to the nice front of the cabinet. And he got it all back together again so I cannot tell it was taken apart. While apart, he added as much insulation to the exterior of the ice box as space allowed. Many years earlier he had added 1″ foam insulation inside the ice box and covered it with formica to protect it, so we have considerably more insulation than the original installed ice box.
We did the refrigeration replacement in May 2014, so details are not so clear anymore, but the only lingering bad memories I have is how the unit did not have sufficient coolant charge after we completed the installation (losing no coolant in the process), but fortunately we have a friend who repairs refrigeration so was able to fully charge the unit so the entire holding plate would freeze. We also had to install a small thermostat-controlled fan internal to the ice box (between our ‘freezer” area and the “refrigerator” area within the ice box) to circulate the air to get more even temperature distribution, but now it works well (provided we remember to manually control the holding plate setpoint, which has now become habit.) The thermostat for the internal fan has its own thermocouple to control the temperature within the refrigeration section, while the Isotherm control has its own thermocouple to control the holding plate temperature.
Hope something in that long note is useful.
Marilyn and Van
ModeratorKeymasterWe have a Perkins 4-108, but I suspect the noise level is quite similar. Rainshadow, hull #126, has good sound proofing already attached to the sole floor, so we’ve gone after trying to improve other areas.
We’ve noticed a lot of the rattle noise is coming from the throttle control area. I stuff a towel between the cockpit side and the control housing, and it helps me be less irritated. Not a long term solution, but helps with the frustration too little wind to sail.
Also, we get a lot of prop noises coming from the aft cabin, so we always shut the aft cabin doors when motoring.
We replaced the engine mounts a few years ago, and that seemed to reduce the vibrations and therefore the noises from rattling throughout the cabin.
We need to replace the foam strips that outline the sole floor doors, as they are compressed badly. Depending on where we stand, there can be very annoying rattles and sound transfer.
Marilyn
ModeratorKeymasterGarhard – we installed a maintenance bilge pump several years ago, and wrote a blog posting about it on our personal blog. You might want to read it to learn about the mistakes we made before we ended up with a setup we like. You can read that posting here.
Marilyn
ModeratorKeymasterThe Nic 38 has issues with its cockpit drains – there are other discussions here and here.
Your ketch should have two thruhulls with seacocks in the engine room – one port, one stbd. The cockpit & lazerette drain holes were originally plumbed to drain through those – but other owners report check valves are required to stop water surging back up the lines into the cockpit.
The PO of our boat plumbed the cockpit drain holes to the bilge, just like your setup. With our good cockpit canvas and hardtop, we have almost no water get in during coastal cruising so rate of pumpout has never been an issue. Not too happy about taking her offshore without improvement, so likely will replumb to thruhulls/seacocks and add check valves.
Note that since the drain thruhull/seacocks are very low on the hull, both will always be below the waterline – so I don’t understand what help it will do to cross the lines through the engine room. If the windward side would be above the waterline, then I understand – but I cannot see how the windward thruhull/seacock will be above the waterline unless she’s broached.
Marilyn
ModeratorKeymasterOddly enough, I just stumbled into an angled v-bolt today. Very little information provided about the strength, but maybe this will lead you to something:
Marilyn
ModeratorKeymasterOur vinyl wall covers were looking dirty, so about 5 years ago I washed them and then painted them with a latex interior paint, such as would be used inside your house.
While it looks better, the dried paint remains slightly tacky so fluff tend to stick to it. I’m not sure why the dried latex paint is so tacky over this vinyl – but maybe a different type of paint would fully cure to a hard finish.
I suspect if you pulled the vinyl covering off, you would have a problem cleaning off the adhesive to achieve a suitable finish for painting. We did pull it off in some repair areas, and as I recall it left a rough surface behind.
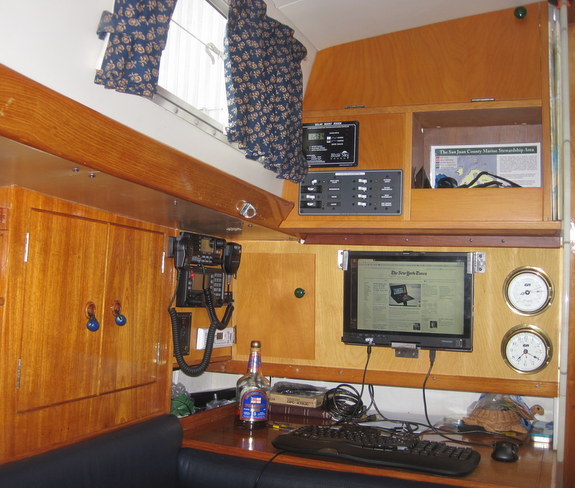
As for the perforated MDF stuff, several years ago we replaced select areas with a 3mm plywood skin without holes. We decided the ventilation was not necessary for the electrical wires that run through those “chases” as they are not carrying much current. You can see one of these replaced areas in this photo:
Marilyn
ModeratorKeymasterAre the heat exchanger and raw water pump still functional and available?
Did you replace the original lube filter housing with a spin-on type that fits? If so, is that available?
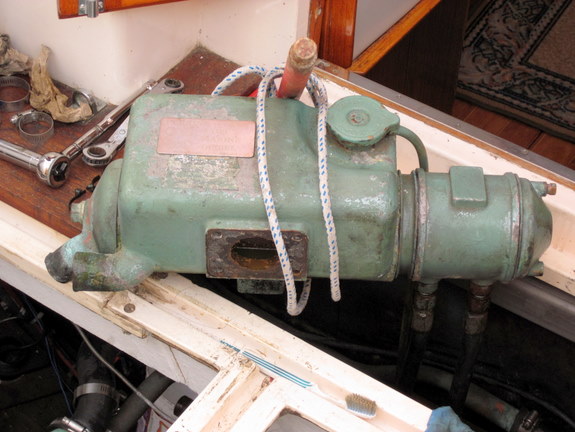
Note sure about the cost of shipping to the US, but if the heat exchanger is in good shape… This is what ours looks like:
 ModeratorKeymaster
Thanks John – silly me for not noticing the heat exchanger at the exhaust manifold. I’m just used to seeing the exhaust manifold there so didn’t focus on the obvious filler cap!
John also sent me a photo to post of a engine with the heater exchanger mounted at the front of the engine over the raw water pump. This is the configuration of our Perkins, but this does not look like a nic 38 engine room.
(fyi, if you want to know how to post photos, see here and read the SECOND response to understand how to add photos to a reply
Along with the photo, he said this in the email – I hope you don’t mind me quoting you, John:
Quote:I have read in the manual that it is very important to align the pump to the drive component so it is probably not a quick exchange. I spent many years as a vehicle machanic and am firmly of the belief that if it ain’t broke don’t fix it. Wear on the cover plate would have to be VERY severe before I would consider changing even that! I hope this helps in your endeavers.
Regards, John.I think we’ll just replace the badly worn cover and once we need to replace our heat exchanger, we’ll add a hot water tank/heat exchanger combo – which means we could get better access to the raw water pump for repairs and be able to get rid of the Valient instant on water heater in the galley (which I do like but I’m not keen on the propane risks.)
Marilyn
 ModeratorKeymaster
Arild kindly sent me a photo of his engine room showing how the jabsco pump fits nicely – how tidy his engine room is!
I am curious though, where is the heat exchanger in this photo? Our forward small engine hatch exposes the top of the heat exchanger with the raw water pump barely visible underneath. This cramped quarters for the pump also makes the idea of replacing it seem more daunting.
(I searched for a photo to show our engine arrangement, but oddly we don’t seem to have one…)
Marilyn
 ModeratorKeymaster
Thanks John – would you happen to know the Part Number of your Jabsco pump?
The Jabsco pump I found listed for the 4-108 has two ports that point in the same direction. They could point in opposite directions if there is room around the pump to thread 90 degree elbows into the pumps ports and then plumb from there.
Does your pump look something like this one?
marilyn
ModeratorKeymasterRegarding the orphaned boat, Jeremy Lines sent me an email saying to the best of his knowledge, Top Spin is hull #2. (Thanks for the info Jermey!)
Since the owner is not a forum member, I will not update the Member Directory with this info.
Moderator
ModeratorKeymasterI was surprised to see the others captain’s chair, as I assumed ours was original equipment.
I have attached a photo of ours, and I have to say, I really like it. The height is just right for me, in that it doesn’t matter whether I am standing or sitting, my head is at the same level so visibility is unchanged. The curved seat means no matter what angle of heel, I can sit “straight”, meaning not putting extra pressure on either hip. I don’t mind the lack of a backrest.
Also, the smaller size of our seat means that the deckhand can grind the portside primary winch while the helmsman stays at the helm (although I usually stand in front of the seat to avoid getting an elbow in my kidney if the deckhand has a particularly wild pull of the sheet during a tack).
This chair is relatively easy to fold away and stow (it’s leg folds inwards), as required to be able to lift the hatches to work on the engine. It’s also sometimes just nice to get the chair out of the way, such as while provisioning or winterizing.
But men, be forewarned – this helm seat seems to be designed for women. Every man who has sat on it for long doesn’t like it. They say it squeezes their hips.
Marilyn
 ModeratorKeymaster
There is another forum topic where this is discussed, you can find it here.
As discussed on our blog here, we put our 13 gallon holding tank in the space behind the head basin where the cubby holes were. PlasticMart sells a tank that is 25″ x 16″ 8.5″, which we were able to fit by making the following modifications:
1) grinding back the chainplate knee ever so slightly (to fit the 8.5″ dimension) (we pulled and inspected the chainplate first, as access is now more difficult)
2) cutting down the bulkhead under the sink and fitting a shelf over it to support the tank,
3) i believe we even cut the fiberglass liner down behind the sink to also make the opening bigger than the cubby hole cutout.
4) We made a new cover to go over all of it, sized about 18.5″ on fwd end and 16″ on aft end, 30″ in length. This requires a cutout to set the sink in place. We actually made this board in two pieces with a horizontal junction, so we could seal the sink in place against the bottom board, yet remove the top board to gain access to plumbing bits for maintenance (such as the lavac inlet hose vent cleaning).It’s a nice design because it can be gravity dumped (note, we added a ball valve under the tank that determines whether the tank is open or closed to protect the blakes seacock from the sewage when its being held. sewage is very hard on bronze seacocks. If you do this, be careful about closing both valves as stuff may grow in the enclosed space and create pressure that stops you from being able to easily open the valves).
We also installed a deck-fill so it can be vacuumed out in areas where dumping is not appropriate or illegal. There are more details on our blog page, or I can answer more questions here.
The down side is the small size. It would be nice to have more capacity because we have filled it if we spend several days at the same anchorage (e.g. when we are hiding from a passing storm).
marilyn
ModeratorKeymasterWe are again thinking seriously about doing this rudder job – having avoided it until now. We are worried because there is a very small amount of play between fiberglass and lower stock – and we are worried about internal corrosion as the rudder leaks.
Ollie (or any one else who has done this) – any words of wisdom? Specifically:
1) The rudder dwg says the lower stock is Manganese Bronze, not SS. Is this true? If so, then maybe the metal won’t be corroded nor require replacement?
2) Was the foam interior core water saturated? If yes, what did you replace it with?
3) Does it work to cut an access hole in one side of the rudder to do repairs and then glass it back closed? Or would it be better to make a mold of the original rudder and build a whole new one?
4) Did repairing your rudder actually eliminate the slight movement between fiberglass and stock? Do the torsional forces on the stock cause it to flex and so the rigid fiberglass delaminates from the stock? In other words, is this small flexing a problem beyond allowing water into the rudder core? If flexing is not a problem, then it seems a suitable repair is to make a flexible collar between stock and fiberglass to absorb the motion and seal the water out.
5) If the main goal of the repair is to replace a saturated foam core and make a post-to-fiberglass collar seal, couldn’t this be done without removing the rudder?
6) Has anyone besides Rampant’s owner Charles had the gudgeon be dizincified and require replacing?
Thanks in advance for any replies.
marilyn and VanModeratorKeymasterHere are the photos that michael sent me for posting. See the above reply for descriptions.

 ModeratorKeymaster
I’m posting Jeff’s response here, to keep this topic together. His original response is under “The value of Nic 38’s”. I’m also including the photos that Jeff mentions below.
– moderator –Quote:Hi there John,
I had the nav-area re-designed in ’07 & ditched the old fuse-panel. New one is a Blue Sea Systems Circuit-breaker panel with the trip-switch panel on the bulk-head underneath the chart-table, & you could choose any size of C/b panel to suit your requirements. Excellent brand & well made. I should have bought a larger panel though, with enough spare switches for future installations. As it is, I have to connect new equip’t onto terminals that are being used already which I’m not altogether happy with, but space was an issue at the time the new panel was bought.
I’ve just taken 2x photos for you, which Marilyn may be kind enough to post on for me.
Regards,
Jeff

-
AuthorPosts