
@moderator
Forum Replies Created
-
AuthorPosts
-
 ModeratorKeymaster
I helped Michael post the pictures of Orion’s davits elsewhere in this forum.
Moderator
ModeratorKeymasterWe don’t have a shower curtain rail either, but regularly use the shower when cruising. Our solution is to remove things that would get soaked (e.g. the bog roll and the hand towel), and then when done, we use a small squeegee to wipe down the walls. It works pretty well.
A benefit to water being sprayed about is that it gives me a chance to give the head a good wash down at the same time. While I wait for the hot water to reach the shower, I use the fresh water to clean the bowl as our lavac toilet doesn’t rinse the upper part of the bowl when flushed. So I sort of view it as a feature that there is no shower curtain. Besides, a shower curtain would no doubt go black with mildew in short order as it would be hard to get dried out if it spent most its time secured at the mast.
Despite all this, Van still hopes to install a shower curtain someday because he doesn’t like it that water gets sprayed all about. 8~) He doesn’t have any plans for how to do it.
Marilyn
ModeratorKeymasterWe still have the original water heater, and are pleased to have instant-on hot water, though it does waste a lot of water as you wait for the hot water to arrive at the tap(particularly in the head).
The pre-purchase surveyor said it was great to have an instant-on hot water heater, but dangerous and no longer allowed in the US due to concerns with the pilot light blowing out so propane leaks into the cabin. We have several propane detectors installed on the boat for just this reason.
MarilynModeratorKeymasterHi George –
When we purchased Rainshadow, she had hank-on sails still (and the original sails as well). We sailed her for one season with these hank-ons, and Van loved the simplicity of the hank-on approach. However, I frequently sat white-knuckled at the helm while he was hoisting or lowering the head sail in heavy seas, so I was rather insistent that we change to a roller furler (We had one on our previous boat, so I knew of its luxury).
We installed a Harken Mark IV Unit 1 roller furler. It required a haylard restrainer be installed at the top to ensure the correct fair lead to avoid haylard wraps. You can see a photo of this installed restrainer here. This restrainer is a harken part as well.
We installed the drum using long link plates in order to keep the drum away from the anchor roller and to get the foot of the sail above the pulpit, as can be seen here. This lost a lot of sail area, but makes it easier to see at the helm. I’m not sure Van (as the deckhand) likes this – I’ll see if I can get him to post later.
Performance is good – once we had the sail sized appropriately for the forestay length, we’ve had no problems with haylard wraps. The trick is to keep the correct tension on the halyard – too tight and it does not roll nicely, too loose and it may wrap. It’s handy to be able to furl and unfurl the sail from the cockpit, especially when the seas are scary rough and it’s time to reef. Even Van has admitted that he is glad we installed it.
If we could do it over, we would add a solent stay and buy a big hank-on light air sail (maybe a drifter). We would buy a working jib to put on the furling drum. Then, when the seas are smooth with light air, Van could easily go forward to hank-on the drifter, and as the wind builds, we could switch to the working jib that could be roller furled smaller. As it is, we bought a 130% genoa for the furler that can be reefed to a working jib. That means if we need a smaller headsail, Van is on deck in the worst seas hanking on a storm jib (on the solent stay that we have yet to add, so we’ve not done this in practice yet).
Another word of advice, the headsail gets chaffed at the lower end of the foil, even if you have the harken feeder to help guide the sail into the foil track when you are raising it. We just took our 3 -season old sails to a top-quality sailmaker (Port Townsend Sails) for beefing up this sail to make it better for offshore work. There were a lot of modifications required at both the tack and the clew as the original sailmaker (North Sails) did not build it for longevity with a furler. So be concerned not only about the quality of the furler you purchase, but also the quality of the sail that will be used with it.
Hope that helps. Marilyn
ModeratorKeymasterWe did not get around to measuring the window fastneres before we headed to warmer climates for the winter, leaving our boat behind to deal with the nasty weather alone. 8~(
We simply rebedded the original portlight. We have not considered replacing them with opening ones, though I can understand why people might find that interesting. But our typical problem is being too cold…. Maybe someday we will sail further south to find some warmth.
Marilyn
ModeratorKeymasterI am pasting a reply I got from Roger Haggar via email. You can find the photos he mentions in a PDF that opens here.
Quote:Whilst I fitted the inner forestay (solent stay) for my trip south didn’t find much use for it.
Yes, I found that the easiest way to tack was to roll up the headsail, tack over and unfurl. (Offshore the tack, or gybe, was a major highlight and discussion as we only had to do it once every 3 days!)Visited the boat today and took some pics which might be of interest, and that is what to do with the stay when not in use.
In use-connected to the deck fitting with a senhouse slip connected to and hardened up with a turnbuckle.
When not in use-disconnected and attached slip to a s/s ring lashed to after lower stay chain plate.Then with the mini block and tackle arrangement attached to the forward lower chain plate slipped the s/s rounded section ‘gizmo’ over the bight of the stay and hardened up. This arrangement worked very well, with the stay out of the way and far enough away from the mast to avoid chafe.
Yesterday tried to find the source of the gizmo without luck. I first saw it in use in Seattle so think that it may be a US item. works well though.
Also drew, not v. well, prefab. section bolted approx. 12″ below mast head, clear of sheaves and spinnaker block. Top hole is for the stay tang and lower hole the halyard block shackle.
Hope this helps.ModeratorKeymasterWe had the same problem attempting to remove our fasteners from the hatch. Van was able to get only one out – and fortunately that was the one that was leaking. He tried several others and could not budge them.
He had removed the plywood interior frame and the headliner – nothing seems to be holding the fasteners in place. So it likely is corrosion that’s keeping it together. We also have found that the bedding compound has turned to dust. Without removing the hatch, he scrapped out as much as possible and then applied Sikaflex 291. Not the best solution, but it allowed us to get underway. It’s yet another thing that is waiting for a proper repair. Let us know if you figure out how to do it.
marilyn and van
ModeratorKeymasterWe just had to reseal one of our portlights last summer. It was while we were away on our cruise, Van looked up and noticed the water damaged teak handrail under the port side portlight. Next thing you know, we had the window in our hands and we’re trying to decide how to seal the big hole in the side of the boat.
Lessons learned:
1) The portlight was held in place with silicone, it was relatively easy to remove.
2) Most of the alumunum fasteners had turned to dust. The few that had not where the ones that were hard to get out, but using a drill we eventually got them all. Took about an hour.
3) If you have to pry on anything, be careful to not damage the inner liner that surrounds the window on the inside. The sandwich is (starting from the outside): fiberglass, gap, wood underlayment, and then that white vinyl covering used throughout the interior is glued to the wood. If you break that seal between the vinyl coating and wood, then lots of debris falls down between and you will not be able to get it out without further delamination of the vinyl. It’s just a losing situation – be careful to keep the vinyl sealed to the wood in the first place.
4) The PO had left some fasterners on the boat from his last go at rebedding another window. The barrel part was too short, so we had to leave the interior frame off when we rebedded the window. Most annoying because now we have to buy longer barrels and probably be forced to rebed the window another time. (In checking the window he rebedded, he ended up using the aluminum barrel on the inside and SS screws on the outside – YIKES! Yet another window we must service again soon!)
I have not yet measured how long of barrel we need, but the sandwich was surprisingly thick – at least two centimeters. You can buy new aluminum “Light Duty Binding Posts” from McMaster Carr for shockingly cheap – something like US$10 for 50. I need to do this soon, so I can post again once I remeasure what I need. From McMaster, the screw size stays constant, its the barrel length that varies. I thought I would need longer screws so I only know what screw size to get for whatever barrel size we have. I do know the screw the PO left behind is an #8-32. I would take a wild guess that if you are buying your fasteners as suggested above, go for the longer barrel because you can always thread them together further, but you just simply cannot make that thick sandwich of materials narrower (we tried very hard to do so!)
5) We rebedded using butyl caulk. Seems to have worked well for the few months since we installed it.
6) We wish we would have put a little insulation between the fiberglass hull and wood underlayment. We did not, and now condensation will form just below the window frame in one area. Not sure what happened, but I suspect we tightened it enough so the air gap between the fiberglass and wood underlayment closed up.Telltale sign that the window needs to be rebedded is that the inner aluminum frame is not well secured down anymore. If the aluminum fastners have turned to dust on the inside, the frame will appear loose – which is bad. Means only the silicone is holding the window in place.
Glad to answer more if I can. Will post the barrel size I purchase once I get down to the boat to measure that.
MarilynModeratorKeymasterHi John – We put our holding tank in the head, behind the sink. We could fit a 13 gallon tank, which is rather small but the Lavac does not use much water. We counted one day – if we do the full Lavac recommended pump cycle, that is 10 pumps-wait 5 seconds-5 pumps more, we got 13 flushes so about 1 gallon per flush. We find this number of pumps is not necessary for most situations, so it’s easy to go closer to double that number of flushes before the tank needs emptying. Details of our installation is on our blog here.
We did consider putting it in the v-berth, but I could not find an available tank that would fit the area with sufficient volume to make it worth giving up all that storage space. We considered this long and hard before we settled on putting it in the head where we did. The advantage of the head installation is that it’s a gravity system, so no need for Y-valves etc. We are pleased with the installation after 2 years of use. And we like having the starboard v-berth locker available for storage.
The other major problem with putting a holding tank in the v-berth is that the locker is a very complex shape, roughly triangular in athwartship vertical cross-section but trapazoidal in horizonatal cross-section. I just turned through my notes, and I have 3 different sets of measurements where we attempted to fully spec the size – including the time we took off the top so we could easily get inside the locker (to get to the screws that allow you to remove the entire top requires that you remove first the ceiling boards, then the wall boards, then the v-berth top)I can tell you that the stbd side locker dims are roughly:
– 35″ along upper hull edge from the fwd locker wall to the line perpendicular to the vertical inside locker wall face + another 8″ aft of that point to get into the upper aft corner along the hull, so 43″ overall, but the aft end of the tank does not make a 90 degree corner (hence the measurement about 35″)
– 19″ athwartship upper forward edge
– 22″ atwartship upper aft edge, perpendicular to the vertical support wall of the v-berth. This is not the same dimension as would be measured at the bulkhead, where there is not a 90 degree corner.
– 19″ vertically from the floor to the top lid at the fwd end, inner edge (that is, not along the hull. Consider the hull to be the hypotenuse of the triangular cross-section)
– 22″ vertically from the floor to the top lid at the aft end, inner edge
A picture would be worth a thousand words here, but if I put one together I think I’d be wasting my time because I still would not recommend you trust our measurements enough to order a custom fit tank based on them.Due to the complex shape, we considered building our own tank in place in the v-berth locker with the plywood stitch-and-glue technique, but then decided this would be more trouble than it was worth. We also ditched the idea of a flexible tank after reading reviews of how little time they last, and how much they cost. We are happy with our final decision about the head location.
So that’s my two cents – I don’t envy you. Putting in a holding tank sounded like such a logical first thing to do after we bought our boat. It turned into a nasty complex job. If you want to know more about the dimensions of the tank we stuffed into the head area, let me know.
Marilyn
ModeratorKeymasterThis is probably too late to help the original requester for information, but George Nauman figured out when he had to replace these parts. Here’s the info he shared with me via email:
George wrote an email to Kevin O’Bryan at Thamesway Marine:
Quote:I would like to locate a shaft Coupling for my Thamesway Marine Gear box. It is a MK IV 12000. It is a 2:1 reduction model. The shaft is 1 3/8 in diameter. The rubber part of the coupling I have has “Silentloc FC173R” imprinted on the rubber.Kevin responded with the following info:
Quote:Prop flex coupling available to suit your application. Part No TM 12307/B3. Price £ 95.00 gbp + carriage.So – it is possible to get replacement parts for these silentbloc couplers from Thamesway Marine in the UK.
ModeratorKeymasterDid you read the earlier posting on this topic? (Click Here to find it)
Did you mean Perkins 50 HP, as in a 4-108? We put on an Axiom prop and are quite happy with it. We have the Perkins 4-108 with Thamesway TMP-12000. You can read about our Axiom prop experiences in the other posting.
Cheers –
MarilynModeratorKeymasterI’m as curious as Pat is – we’re planning to disect our rudder next year, and we’d love to learn from those folks who had already had to do this job. We talked to a shipwright today, and he is suggesting that 1) we cut open the side, 2) dig out all foam etc (or whatever is in there), 3) replace the metal parts, and 4) prep it for epoxy infusing new foam and adding a new skin on the disected side. This shipwright loves to do epoxy infusions, though he says he’s never done it on a rudder before. We’re worried that such a repair would mean it is impossible to ever disect the rudder again to replace the metal parts when required in the future, as the rudder will essentially become a solid foam/epoxy structure with the metal armature + post buried inside.
For those of you who have already tackled this rudder repair – how did you do it?
Cheers – marilyn
ModeratorKeymasterWe sail where is cold (water temp is about 10-14C so the wind is always cold), so we almost always have the canvas down except a few days in August. The windows are extremely important to us – we don’t have much problems with condensation – I just wipe them down in the AM, and keep them clean using Plexus a few times a season. The Plexus really helps with the clarity. Maybe this is all an attitude thing – I love being able to roll up the side canvas, but when its cold, I would rather be warm.
Also – I’m not sure I get the “extrnal covers” thing over the windows. We just have canvas with windows, no covers. Are you saying there can be shades pulled down? This might be nice to keep the glare off the instruments sometimes.
We’ve had good canvas since purchase, but I have made a few repairs. The canvas itself is some top quality material used to make flexible buildings – the PO was into that business and had some scraps left for making this canvas. It might last a lifetime. He had the windows replaced several times, a local shop just cuts out the old and welds in new, so the seam is getting thicker with time.
I used Tenera thread to stitch the canvas modifications – it outlasts everything in regards to UV degredation. We added some flaps to keep the rainwater from coming through the zips.
I also used Riri UV resistant zipper chain with plastic pulls. My supplier was Sailrite, but they stopped carrying it this year. Riri zips are far superior to the typical zips because they open/close much easier.
You might check out the fabric at Rochford Supply – their prices are cheap but their shipping is dear to make up for it. The have a variety of quality materials (but no Sunbrella), and supply the industry rather than the hobbiest.
Marilyn
ModeratorKeymasterSimon says
Quote:I’ve narrowed my boat choice down to either a Westerly Typhoon or an Oyster 403 / 435.So he has asked to be removed from the forum. Thanks for your interest, Simon.
ModeratorKeymasterWe just added a wiper motor this spring – the PO had removed the original some time ago. We have the motor hardware attached, but have not had time to wire it up yet, so cannot say how it works yet.
Since we are in the US, availability is a little different, but we chose an AFI-500 motor with 110 degree sweep (self-parking) and 2.5″ spindle length, 10-14″ adjustable arm, and a 14″ blade. We are just using a simple on/off switch. Cost for this barebones setup was less than $100. I think we will be happy with the sweep pattern. There are so many choices once you start studying this – arm length, sweep angle, blade length, motor power, sweep style – it was a bit overwhelming, but I eventually decided that we didn’t need a powerful motor (8 NM will do) because the windscreen is not really that big. And since it is wider than tall, pantographic doesn’t seem to useful.
There is another wiper posting, where Jeff talks about how he used a vetus motor. You can read that here. He chose a pantographic mount, so maybe Jeff can speak up and state how the pantographic works for him.
marilyn
ModeratorKeymasterSpeedseals are available in the states – bit costly by the time its sent here (around $120 for cover and some spares). Now that Van has drilled those holes (which are mostly behind the step that Arild describes) getting the cover off is not the problem. It’s getting the impeller out. He just gripped it with a visegrip and yanked it around until it came out.
I had hoped someone had shaped a clever tool for pulling the impeller. I think he tried a 90 degree needle nose pliers the time before – but this last time that tool seems to have disappeared so he went for the visegrips.
Removing the whole pump – that’s an interesting idea. We’re planning on doing a minor kit repair on it next time anyway. I also read a good idea about keeping a spare pump on board, then when something goes wrong its easy to swap in a new pump, and do the necessary pump rebuild at your leisure later.
Thanks for the replies! Marilyn
ModeratorKeymasterVan finally got our engine mounts replaced, which has resulted in a lot less vibration. We used the Bushings Inc DF 2207-2 mounts, which I recommend because they have the correct minimum clearance. All other mounts I mention above have too high a clearance for ideal engine/shaft alignment.
I’ve made a posting on our own blog about this saga, if you want to know more.
The posting also describes the laser alignment jig that Van made to detect misalignment. It seems on our boat, the sweet spot for best alignment is a clearance between engine bed and engine bracket of about 2.375″ (about 60 mm). Most engine mounts do not have that low of clearance.
Marilyn and Van on Rainshadow
ModeratorKeymasterRichard (or anyone else who has repaired their rudder) – can you report on what happened with your rudder repair? Any advice for those of us who plan to tackle this job before the rudder fails?
We hope to work on our rudder this winter. We are trying to decide if we should haul the boat, remove the rudder and split it open so we can try to dry it out over the winter and then do the repair in the spring. If the boat overwinters on the hard, then the hull will freeze occasionally during our Seattle winter, and we are worried that the freeze/thaw cycles will be bad if there is a lot of water absorbed into the hull (due to blisters, cracks, whatever)
If we plan to tear into the rudder so that we can replace the metal interior frame, it is important that the rudder has time to dry out? Or will we be doing so much destruction that most fiberglass will be new anyway, so it doesn’t matter?
Any advice welcome.
Cheers – Marilyn and Van
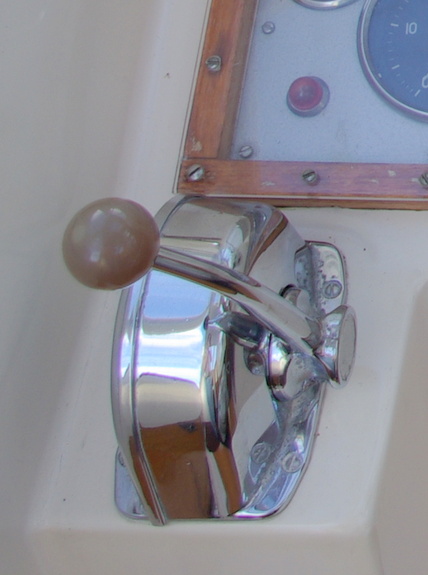
ModeratorKeymasterHmm – I wonder if we have different controls. This is what ours looks like. In the earlier posted photos, you can see where the red cables connect to the control – I think. We’ve never done any work in this area, so we’re not familiar with these trunions you speak of.
Marilyn
 ModeratorKeymaster
Hi Peter –
We finally remembered to get approximate measurements for the cable lengths on our boat, which has a Perkins 4-108.
Throttle cable is about 2.5 meters.
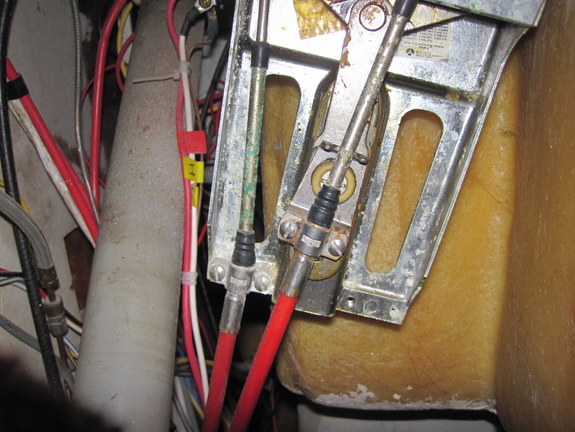
Gear shift cable is about 2.2 meters.We took a couple pictures of the bottom side of the Morris control so you can see the red cables coming into the the connectors on the bottom of the control.
Hope that helps –
Marilyn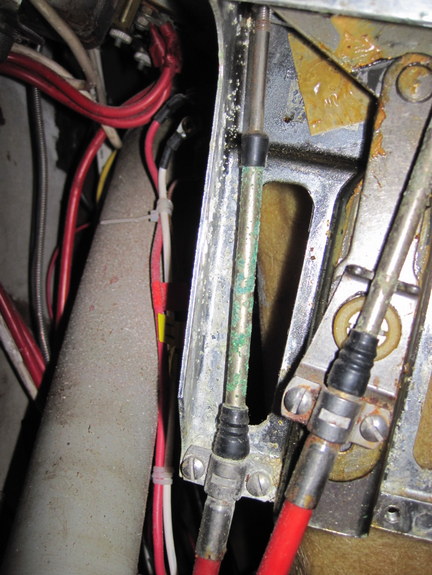
 ModeratorKeymaster
Jeremy provided the following info via email – I thought I would post it in case anyone else encounters this oddity of trying to understand the Nic 38 to Nic 48 coach roof sizing.
Quote:Looking at small drawings is not accurate but the length to height ratio is not dissimilar, I think the 38 height is a little greater but the 48 is a bit bigger. The slope at forward and aft ends is similar but the 38 coaming rises forward to the screen whereas the 48 has a smaller radius and runs up a track on the aft side of the GRP windscreen pillar. The main difference will be the 48 is wider but that can be cut out. This has just made me realise that the digitised drawings are no help as I want to overlay one over the other and I am not clever enough to scale them ! I think the zip door on the 48 may be a bit further aft but you will probably have to cut the front off to fit. I am still nervous that this may be a disaster but it may well be worth a try.So – we’ll see what happens.
ModeratorKeymasterThat’s encouraging Roy, thanks for the reply.
The R&D Marine couplings claim to have variable flexibility, with greatest rigidity in the prop thrust dimension. Here’s the quote from their brochure:
“Soft vertically and at right angles to the crankshaft to isolate vibration, stiff fore and aft to take the propeller thrust.”More details on the 800-010 is available on their website (providing link to UK site):
http://www.randdmarine.com/enginemres.aspModeratorKeymasterOK – we’re still on the quest for new engine mounts. Our bolt centers are 4″, and there are plenty 4″ mounts to choose from, so that’s not a worry. It’s the clearance that’s the issue.
Our mechanic recommends R&D Marine “supermount” style 800-010, because they are designed to survive rollovers. But he is concerned about their their minimum clearance at 3.05″ (77.5 mm). We measure our old mount’s clearance to be about 2.25″ (57mm). Our current ancient mounts appear to be “bottomed out” – we are thinking the engine may have settled as their rubber compressed. We’re also thinking the flexible couplers are rather flexible….
I can buy a Polyflex P#4.5F-60-11-16, which has minimum clearance of 2.42″ (61.4mm) – but the installation manual for these repeatedly stresses that the engine bed must be parallel to mount base (within .005″ or 0.127mm), or the life of the mount is compromised. They also have only a 1 year warranty, and mention nothing about rollover tests. So the R&D Marine mount sounds like the better quality product.
Does anyone with a Perkins 4-108 who has replaced their mounts have any advice about the clearances?
Finally, the mechanic is planning on supporting the engine during the job by wedging some wood under the engine so it is temporarily supported by the fiberglass pan under the engine, rather than by the stringers. Is the fiberglass pan strong enough to take the weight of the engine?
Cheers –
marilyn and vanModeratorKeymasterI just got word from one of our members that this cockpit canvas is actually for a Nic 48 – not 38.
Does anyone know if a Nic 48 has the same size hardtop cover as a Nic 38, and whether this might still fit?
Marilyn the moderator
ModeratorKeymasterTrevor – did you replace your engine mounts over this last winter?
I’m just looking into this again now, and I found that the US supplier Bushings Inc claim their DF2207-2 is the right choice for the Perkins 4-108. They think the hole spacing is 4″ – I’ve not been to the boat to check that out yet. Here’s a link to their brochure for the DF-2200 series.
I also found Thermoboat Yachtsman series, looks like the YC-4-110-300-5/8 should work. Their brochure is here.
And finally, out of Australia the PolyFlex P # 4.5 CTF 60-15-16 is supposed to work.
I’m wondering if anyone who has already tackled this job can offer more advice before I start ordering parts?
Marilyn
-
AuthorPosts

