
@moderator
Forum Replies Created
-
AuthorPosts
-
 ModeratorKeymaster
I have introduced Barry and the Chapman’s via email. The Chapman’s replied with a little more information about this boat that is still for sale.
Quote:no osmosis excellent condition offers in the region of £45,000. The boat is at the yacht club at skipool in thornton lancashire. ]You can read a little more about Nicolisa on the forum posting when the Chapman’s were introduced – here
February 17, 2012 at 20:15 in reply to: Welcome to Simon Davis, future owner of Nic 38 (maybe) #11251ModeratorKeymasterI’ll connect the two of you via email. Marilyn
ModeratorKeymasterHi Peter –
The CD that Jeremy offers includes a drawing for how to make brackets and telescoping stands that allow the boat to be beached without tipping. It’s not trivial – requires some glassing – but the point is the boat is designed to sit nicely on her keel.
Cheers – marilynModeratorKeymasterHi Kenneth –
We wanted to make the V-berth be one big bed as well. As built, most Nic 38s has two single berths, one on each side.
To fill the center V, the PO had added athwartship berth boards that rested on top of those vertical edges. This made for a flat surface for the foam bedding, but it made the bed very high off the floorboards.
We are in the middle of a redo right now. We decided to add some boards to support filling the middle V with a board that is at the same height as the existing side berths. This meant we could feel those vertical edges, as you say. Our solution is to:
1) Replace the worn out foam cushions with new ones. Foam collapses over time, so new cushions should help. (The vertical edges are 2.5″ tall, so firm 4-5″ cushions should be enough to hide the feel of the vertical edges.)
2) We chose to use 4″ Drifast foam (1.8 lb/ft3 density with a 60lb ILD), which is an open cell foam usually used for outdoor cushions that allows any moisture to drain straight through it. This is an unusual bedding choice as it is very firm, but due to the condensation problems we have in the V-berth, we thought a foam that can dry quickly might be a nice feature. We bought 3 different Drifast foam pieces, 1 for each side and the 3rd for the center V – so the vertical edges are still not covered with foam. This allows us to convert back to single side berths easily.
3) To make the firm Drifast softer, we bought a 1″ Latex topper that covers the entire area. That means it pads the vertical edges as well, in case it is possible to feel those still between the 4″ Drifast foam pieces.This is a work-in-progress at this time – we’ve not tried the whole setup on the boat yet, but we have high hopes it will work. When anchored (rather than at sea), it is very nice to have the forward cabin be one giant sleeping area. We thought about changing to a pullman in the fwd cabin, but the loss of the possibility of separate single berths seemed a shame, so we settled on the giant trapazoid bed shape instead made from 3 seperate cushions and a removable center V.
Hope that’s understandable. We will update once we finally try this new setup on the boat in a few months. It’s got to be better than the old foam cushions!
Cheers –
MarilynModeratorKeymasterI’m a bit confused by the description of “main drains from the top of the cockpit floor”. In Rainshadow, the drains are not visible when the cockpit sole doors are closed. The only floor drains are in the channels just below the sole doors. There are also some drains at the cockpit locker seat level on both sides. There are channels molded into the FRP to guide the water to these seat-level drains.
Rainshadow is hull# 126 – I am wondering if there were some design changes over the build-run, which means we have different designs (or perhaps differently creative POs?).For anyone who has “sole-level drains” – could you post a photo?
Cheers –
MarilynModeratorKeymasterI would love to see those photos, Roy, so please do post them once possible – thanks Marilyn
ModeratorKeymasterAh – come’on Adrian. You’re amongst friends here – and its a damn poor mind that can only think of one way to spell a word.
BTW – Google Chrome has an automatic spell checker – it’s working right now for me as I write this. I guess IE has an add-in too.
Cheers – your lazy moderatorModeratorKeymasterRainshadow’s setup is completely different, which means we do not have this problem. The PO rerouted all cockpit drains to the bilge (seacocks are probably corroded closed by now, so we’ve kept this arrangement since to date we’ve only sailed in protected waters with limited chance of boarding waves). We have a small automatic diaghram bilge pump that gets rid of this sort of low level water accumulation. We also have cockpit canopy that keeps out 99.9% rain.
My thought is – assuming your bilge is fitting with an automatic bilge pump, how about having a secondary cockpit drain system that dumps rainwater to the bilge so you can avoid flooding your engine bay? Not sure how to add this secondary system, but I think I would go after solving the accumulating rain water problem first. It cannot be good for anything to get regularly soaked.
ModeratorKeymasterHi Peter –
Clever Van, my captian and co-owner, mounted all bilge pumps, switches and sensors on a vertical plastic “board”, which lowers into the bilge and is held in place by mounting to the “bulkhead” above the gearbox. Having everything mouted on a removable board not only means he could do the work in the first place (as sneaking past the shaft to the depths of the bilge is indeed impossible for the average yoga yachtsman) – but also yearly maintenance is easier because he can pull up everything mounted to this board and work on it in a more comfortable position than having your head hanging in the bilge.
While at a DIY store, Van found this hollow plastic 6″ wide board meant to be used for house deck railings. He shaped it to size, figured out the correct mounting positions for everything (through trial and error with much cursing I am certain) and then eventually bolted in place the board with attached bilge equipment. It took several iterations to get it all functioning, and I believe he is still not happy with it. The idea of the plastic hollow board meant it’s lighter weight, and won’t rot like wood will.
Van’s not here right now – I’ll have him read this later and see if he has more to offer. Sadly, we have no pictures of this, so I hope you can imagine how it looks via this description.
Cheers –
MarilynModeratorKeymasterRoger sent me his photos, so now I can post them for all to see.
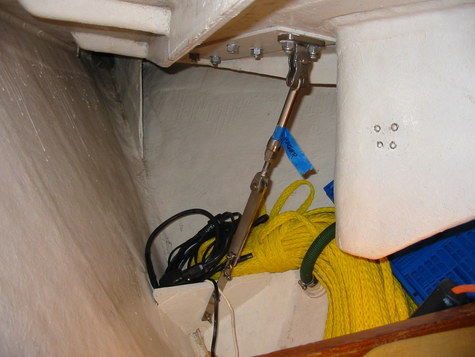
Earlier in this thread, Roger explained how he added his solent stay:
No photo for this part:
Quote:…Put an pad eye on the mast head appro. 12″ below the mast head sheaves to accept the upper stay, and at the deck …Photo below shows:
Quote:removed the 2 after bolts from the centre staghorn ‘bitts’ and fashoned a ‘U’ bolt which replaced the previous bolts and which allowed an ‘eye’ to pick up the lower attachment for the stay.Photo below shows:
Quote:To beef up the underdeck I glassed in to the inner stem an angled mini bulkhead sufficient to attach a turnbuckle which in turn attached to the underside of the “U’ bolt protrusions at the deckhead.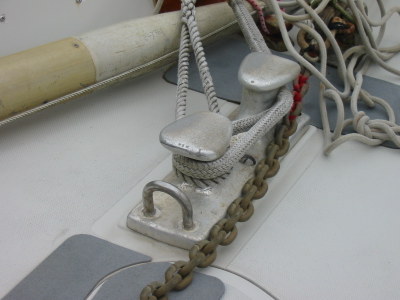
 ModeratorKeymaster
Hi Michael (aka angelsson) –
Yes, we have installed a fuel polishing system, but yours seems more clever because it can do double duty. Ours just polishes and returns to the tank. I would be very interested in seeing your diagram. Pls email to me at Rainshadow(at)driftwoodkey.com – just replace (at) with @.
The details of our fuel polisher are described on our blog here.
Cheers – Marilyn and Van
ModeratorKeymasterJeremy Lines sent me this via email
Quote:Gerard Fischer’s DA LY EXPRESS is No 125.Gerard – in case you don’t know about Jeremy, he is retired from Camper & Nicholsons and now acts as volunteer archivist for many of the vessels that he helped build while working there (such as the Nic 38). We’re very lucky to have his help!
ModeratorKeymasterThanks everyone for answering this. I started the topic because Richard recently asked me this:
Quote:I have recently purchased an Aries and was looking for some photos of the installation on a 38?Can anyone explain to Richard how your Aries is installed?
If you want to upload photos – use the Reply link in the blue tab at the top of this thread and then below the new Reply box you’ll see links that allow you to upload photos with your reply. (These photo upload buttons are not visible if you use the Submit Quick Reply button just below here). Sorry its a little messy to upload photos, but that’s what you get when you create a forum using freeware. 8~)
Cheers – Marilyn
ModeratorKeymasterAh – one more thing, Trevor. When we cleaned our fuel tank, we had about 20 gallons diesel. So we paid the mobile fuel polishing service several hours of wages as they filtering all that diesel. They also charged us for several expensive filters. I think he went through 3 of them. End result was maybe US$500 or more was spent on keeping that 20 gallons of diesel. That didn’t make economic sense.
You might consider starting with not much diesel, and plan on discarding it. Scrub the bottom of the tank, then siphon out the gunk and diesel together and discard it all. If you don’t bother filtering the gunk from the diesel, you might save some money.
Not sure who will clean tanks that way, or how you might get rid of dirty diesel in an environmentally responsible manner – but it’s something you might consider.
Marilyn and Van
ModeratorKeymasterHi Trevor – yes, we have cleaned our fuel tank. We were also scared of the bolts falling in. It did not happen. Removing the lid was relatively straight forward. The two biggest problems were:
1. how to pry off the cover once the bolts were removed (just took patience and persuasion.)
2. How to get a new gasket. We had a diesel mechanic make on for us from cork sheets.A word of caution – do not lose any of the nuts as you take them off. They are BSF threaded, and so replacement is not straight forward! Fortunately, we could reuse all of ours.
We have a posting on our experience here. The photos at the bottom of that page will be interesting for you. Click on the i icon just above the photo to be able to read the caption that explains what you are seeing.
Be glad to answer any more question if we can. This task was definitely worth the effort – our tank was filth! I strongly recommend – just do it!
Marilyn and Van
ModeratorKeymasterOn Rainshadow, we have the original masts and booms, which means we have the roller reefing boom on the main. We do not use the roller reefing boom, and instead use slab reefing. We thought about trying the roller reefing, but everyone we asked steered us away from it, so we never tried it.
Regarding spar corrosion, ours are not too bad, but we’ve found that the stainless steel fasteners used in the aluminum spars are corroded in place. These seized SS fasteners mean we cannot service the internal outhaul, for example.
We recently bought new sails from North Sails in Seattle. The main is a 7.8 Oz Nordac (dacron) cloth with two leech (lower) and two full length (upper) battons. There are two reef points. This sail cost us about US$2000.
Sadly, the sail design was not a good fit to the boat, despite the North Sails rep taking measurements himself and discussing each of the following points during his visit. If you purchase a new main, make sure your sailmaker does not make the same mistakes.
1. There was too much roach, so the top full batton hung up on the backstay at each tack. To correct this, the sailmaker had to trim the roach and recut the batton.
2. The reefing points were not correctly aligned with the reefing block on the boom. We had to remount the reefing block further aft to have the correct fairlead to the block.
3. The luff was about 9″ too long. We had to lower the boom and also use a spectra main halyard so the eye splice is very small, which allows us to raise the head slightly higher as well. This was required so the boom does not collide with the cockpit roof. (Before the roach was recut per point #1, the rep suggested we lower the boom even further to solve the backstay hang-up problem).When picking your sailmaker, find someone who will take into consideration all of the boat, and not just the i j p e measurements. Balance is important. After getting new sails, we had to rake our mast forward, else the weather helm was unmanagable.
We are generally happy with the slab reefing concept, as it’s simple. We’ve never used an in-mast furler, so cannot comment.
Our plan is to progressively replace the standing rigging because the wires are about 15 years old and the hardware is mostly original. So far, we’ve only replaced the forestay as part of installing a new roller furler (Harken Unit 1). We plan to use Dyneema Dux for the main lower shrouds to reduce mainsail chafe when running, and also use Dyneema for the mizzen running backstays so they are more easily handled. The remaining standing rigging will be SS with sizing according to the original Nic 38 handbook. We don’t have any quotes for the materials yet – we’ll do the installation ourselves.
Re-rigging a ketch is more expensive than rigging a sloop. Start counting, and you’ll find 12 chainplates plus the stem fitting and backstay fitting. That’s 14 wires and their accompanying hardware. But we like the ketch sail plan because the sails are more easily handled by one person, and with a properly tuned rig she does sail nice!
Marilyn and Van
ModeratorKeymasterRainshadow’s previous owner said he had seawater get back into the engine exhaust manifold, and discovered the reason why was a cracked exhaust mixer. His mechanics solution was to repair the exhaust mixer by welding it, rather than replace it.
I do not know the details of what failed, or what welding was required – but you might remove your exhaust mixer and find a welder to ask whether they think it can be repaired. Our repaired welder works great.Please let us know how this repair turns out.
Marilyn
ModeratorKeymasterYou cruised the West coast US by land?? We’re in the Seattle area – I wonder if you made it this far north, as we would have enjoyed hosting you and learning more about your adventures! Maybe next time. 8~)
Marilyn and Van – RainshadowModeratorKeymasterRichard – that’s sobering news about your rudder.
In case you missed it, there was an earlier posting about rudder problems, including a photo of a dissected rudder down towards the bottom of the thread. See here.
Please keep us informed about what you learn. This is a project we plan to take on some day – hopefully as preventative maintenance rather than a repair after a catostrophic failure like yours!
Marilyn
ModeratorKeymasterHi Jeff –
We do not know of a Nic 38 with a 4 blade prop. The comment about such a prop in our blog is that we considered buying one based on the calculations, but the closest we could find was a 17″-10 4 blade cut down to a 16″. Our calculations suggested what would be appropriate is a 15″-10 4 blade.
You mention when you had the 18″ screw you had great control in marinas. I experienced the same with our first Axiom that came too close the the hull. In fact, I had too much power at idle RPM gearbox engaged for my preferred slow speeds in tight quarters – but I got used to it. Now with our new Axiom prop, I feel almost nothing at idle RPM gearbox engaged, so I need to get used to giving it some throttle to get us moving. Once I start doing that, I might feel like I have a little more control in reverse with our second Axiom. (Van has a better opinion of the steerage control it provides in reverse than I do, but he points out that maybe I expect too much.)
Marilyn and VanModeratorKeymasterVan and I finally reached a solution for the prop on Rainshadow – the Axiom. Van has prepared detailed reports on our blog, http://www.svRainshadow.com
Part I: analysis of the correct prop sizing
Part II: The Axiom installed
Part III: The second Axiom installedShort version is – we like our new Axiom prop. I need more time at the helm getting used to it, but it’s certainly an improvement over our 16×10 corroded screw!
As we say in the blog postings, Axiom the company was excellent to work with – they stuck by their promise to get us a prop that works. You can find them online at axiompropellers.com.
ModeratorKeymasterYes – the white metal bearing replacement was done so quickly compliments of Pete at Port Townsend Foundry. He not only knows what “white metal” means, he had enough in stock to make the casting on short notice. He then machined the new bearing to be a precision fit on our worn shaft, which meant it was quite tight while slipping it over the larger diameter area between the taper and the shaft wear area, but then the shaft slips into the “sweet spot” just right. He charged us seven hours of shop time, during which he produced this new custom fit bearing, made a new shaft key, and cleaned up the shaft. Keep in mind, I called him about noon on Thursday, and by Friday at 5:30PM we had the new bearing in hand. Friday morning, before he made the white metal bearing, he explored whether a composite would be the better solution because he said people who know what “white metal” means are getting harder to find. But after finding the leadtime on getting composite material shipped as well as the cost of it, he decided it was financially most prudent for us to sit on the hard only one day while he used the white metal he had in stock. We just got lucky with his schedule because he said his calendar was fully booked the couple weeks after this job, so he knew he had to get it done on Friday else we wait for sometime. We felt well cared for during this whole process!
If anyone needs the services of a foundry, I strongly recommend Port Townsend Foundry. Pete is extremely knowledgeable about sailboats, and great to work with.
Regarding our new prop – yes, that’s an Axiom prop. We’ll give a full (generally positive) report on our experiences with Axiom once we get a chance. Van is currently still working on our leaking injector pump problem…
Marilyn
ModeratorKeymasterI wonder whether the engine alignment is so critical, if your Nic 38 has the same incredibly flexible shaft couplers that ours does. When we replaced the white metal bearing, the coupler closest to the gearbox is so flexible that we could swing the intermediate shaft downwards and pull the tail piece inboard after unbolting only the aft coupler.
The mechanic involved with our white metal bearing job marvelled at Rainshadow’s shaft couplers, and then said that they must be a way to avoid precise engine alignments. So maybe this is not such a concern.
Arild – I wonder what you found about engine alignments?
Marilyn
ModeratorKeymasterWe finally replaced our white metal bearing, with another white metal bearing. It did not work out for us to use Maritex composite (as discussed above) because the bearing has to be fit to the shaft wear. The separation between us (in Seattle) and H4 Marine (in UK) was too far to try this.
Instead, we worked with Port Townsend Foundry, whom I strongly recommend to anyone in the US, particularly the Pacific Northwest. You can read all about our replacement process on our blog here. On that page, I’ve included detailed steps on how to do it, as well as some photographs. We’re happy to answer any questions on this process for whomever needs to take on this task next.
Marilyn
ModeratorKeymasterHi Trevor –
Practical Sailor (US magazine, check http://www.practical-sailor.com) had an excellent article on biocides in July 2009 issue. They performed tests to determine which biocides did the best at killing their two different cultures of “bugs”. They also have a good explanation of what the “bug” is.
The article found that different biocides have varying success rates with their two bug cultures. So, they recommended that you pick two of their recommended biocides, each of which effectively killed one of the cultures. Then alternate biocides at each fill.
They recommended these that killed their “culture a”: Star Brite Biodiesel and Valvtect Bioguard. These killed their “culture b”: Biobor JF, Racor Biocide. In the article they show the complete results, which are interesting.
After reading this article, we chose to alternate our use Valvtect and Racor biocides. (In fact, Valvtect marine diesel fuel is available here in the US, which already has the Valvtect biocide included in the fuel.) We have used this combination for about 15 months, and not had a problem (maybe we would not have had a problem anyway, but we are currently running on old fuel we obtained last October and still have about 1/2 tank left).
Last year, we had our tank professionally cleaned and then installed a dedicated fuel polishing loop in hopes we never again will need to clean the tanks. Maybe that was overkill, but we don’t want to experience what you’ve just gone through. (You can read about our cleaning experiences hereand the dedicated fuel polish loop here).
Congrats on getting your engine working again.
Marilyn -
AuthorPosts