
@moderator
Forum Replies Created
-
AuthorPosts
-
 ModeratorKeymaster
I learned this from Tom Riding, her owner.
Her mooring parted some few metres below the water on the same stormy late September day that saw a cruise ship break her moorings at Greenock Ocean Terminal, some 3 – 4 miles upstream from Gourock where Snow Star was moored. She (Snow Star) quickly crossed to the north bank of the Clyde and parked herself on a rocky shore close by Kilcreggan pier. By the time the salvage crew were able to get her off (a few days later) she was in a sorry mess on the starboard side, with a hole in the hull and sea water inside.
As I understand it, the insurance company settled and made arrangements for Snow Star to have a chance at a second life – hence she is for sale as a project boat.
I wish the best for everyone involved, and I feel for your loss, Tom.
Marilyn, moderator
ModeratorKeymasterThere is no boot around the mast in the head on Rainshadow. There is just a cutout in the floor, which the mast passes through.
I’ve never considered that there might be a mast boot missing there. I don’t think there would be anything to seal a boot anyway. We’ve not had a problem with shower water entering the cutout, at least not that I have noticed.
Marilyn
ModeratorKeymasterAh, my mistake.
Our interior ceiling lights have glass shades, which are most annoying because they has sharp decorative ribs on them. Quite painful when you hit your head against one. I think I would prefer deteriorated plastic.
Of course, we could change all the fixtures to solve the problem – which may be what you need to do as well. I’ve considering trying to find a replacement shade that would fit the fixture, but it seems a lost cause. New LED fixtures would be quite nice. (Although we have replaced the bulbs in ours already with LEDs).
Perhaps a picture of your lights may get a different response from another forum member.
Marilyn, moderator
ModeratorKeymasterSeacale II has a new owner, Marco Castriota, who has also joined our forum.
Marilyn, moderator
ModeratorKeymasterI am happy to report that Nicholas now owns Hull #53, which you can learn more about its recent concerns here.
We look forward to learning more about how your project goes, Nicholas.
Marilyn
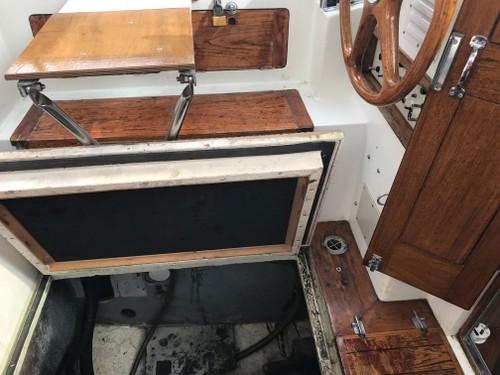
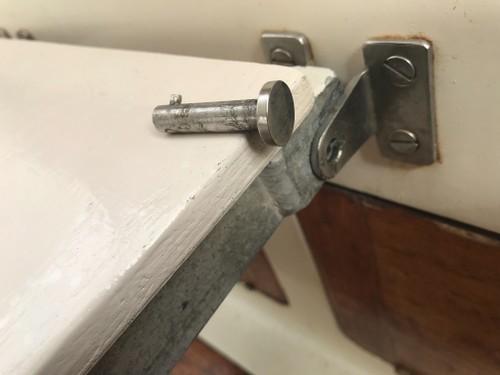
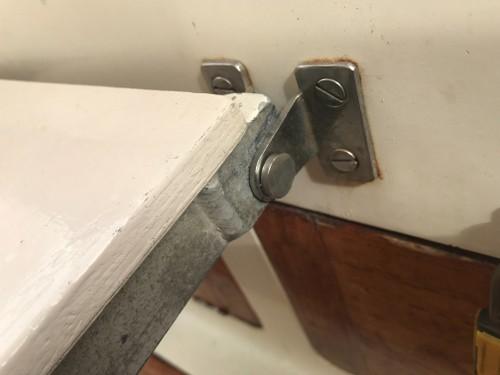
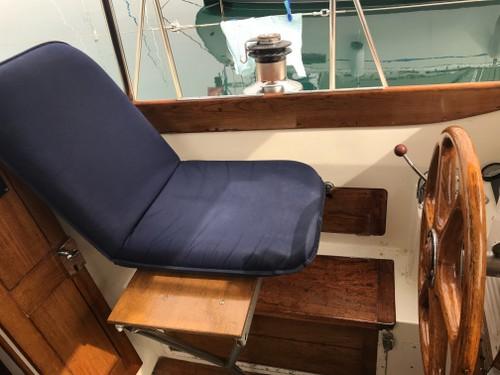
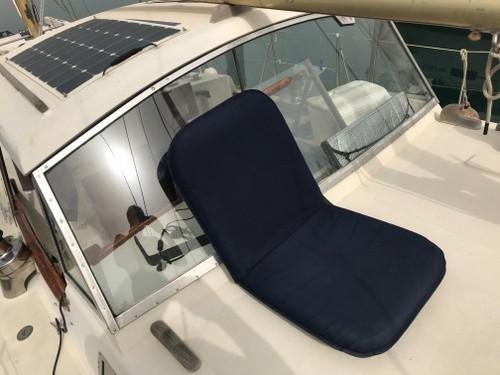
ModeratorKeymasterBrian Glover sent me an email with photos. He said”
my helm seat on Suala came with her when I purchased her. I presumed it was the original design.
It had a white folding backrest chair attached by screws onto the flat shelf.I removed the chair and extended marine ply across the top surface. I have a folding chair that I put on top and lean back against the coach roof behind the cockpit. The shelf folds flat and stores in the port side locker with the fenders emergency tiller and spare anchors and ropes, standing upright against the side or flat on top of the fenders whilst sailing rough seas. Access into the engine compartment is not interfered with when the seat is in place. The foldable chair can be used on the deck or any flat surface as well.
The seat has rubberized non slip so does not move on the varnished plywood. Very practical and versatile. Very comfy to sit at the helm with my leg over the side, leaning back and my inner foot through the wheel onto the dashboard! Real cool!


 ModeratorKeymaster
Rainshadow does not have anything like this – are you saying your side portlights lenses are made of plastic, or is this “plastic cover” some sort of interior shade?
Marilyn
ModeratorKeymasterHi Anne –
The Nic 38 has issues with its cockpit drains and its bilge pump outlet being so close to the at-rest waterline – there are other discussions in other postings:
– Topic Self-bailing Cockpit
– Topic Protection for Alternator – this long discussion covers the cockpit drain problem as well
– Topic which captures an email exchange that occurred before this website existed.
There are basically two important points:
– if you have an bilge pump connected to the starboard bilge thru-hull, make sure the line has a check valve (or a siphon break) in it so water cannot siphoned back into the bilge after the pump shuts off when the bilge pump outlet is under water. This is a particularly sinister problem if you have an automatic bilge pump that will cycle on its own perhaps when you are not aware that it is running because you are having so much fun sailing hard on a port tack.
– if your cockpit drains are connected to the thru-hulls below the engine room, you probably need check valves on those to stop water surging back up the crossed lines. Alternatively, many owners direct the cockpit drain water into the bilge, and then pump it out.
Hope that helps explain the problems better.
Marilyn
ModeratorKeymasterThe issue aboard Rainshadow, which Van and I own, was that the angle that the jib halyard made relative to the swivel was too small. The solution was to install a halyard restrainer near the top of the mast so the halyard approached the swivel at a steeper angle. We have a Harken restrainer one similar to this (not sure the size is the same).
There are good discussions about halyard wraps, and how to avoid them, for example this one on Ocean Navigator.
Hope that helps.
Marilyn, moderatorModeratorKeymasterCharles – I’m just clutching at straws for you as to why Rampart sunk, so let me ask a couple questions.
On your last sail, were you sailing hard on a port tack, putting the starboard bilge pump outlet below waterline? Do you have an automatic bilge pump connected to that outlet, without a check value to stop a siphon into the bilge when the outlet is below the water line? Others have taken on a lot of water from this siphon effect, but discovered the problem while still aboard.
Does Rampart have the original cockpit drains that connect to the seacocks in the engine room without check valves? The cockpit sole is also very close to the waterline.Could it have been that you took on enough water while underway that the siphon continued after you departed, and eventually Rampart sunk?
Even if a siphon is the not at fault here, it seems possible in the wrong circumstances. I think I will add “check bilge water level” to our disembarking check list.
It would be sad indeed if she were scrapped. But I don’t have a solution for you. I’m sorry for your loss.
Marilyn, moderator
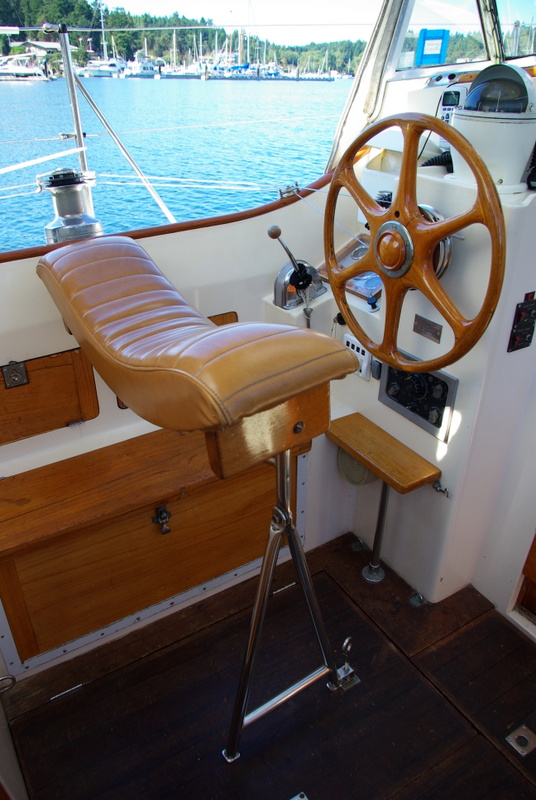
ModeratorKeymasterOne more suggestion – check out the footrest under the helm in this photo. Height just perfect for setting your foot on it while seated.
 ModeratorKeymaster
I have corrected the problem with the photos that made the text disappear of the right edge. The overflow occurs when someone uploads a photo that is too large.
Sorry the forum is not more robust to avoid this problem in the first place.
Marilyn, moderator
ModeratorKeymasterOver the years, we used various materials to rebed windows.
Our first portlight was rebedded in 2016 using Sikaflex 291. That seal is still holding.
We later switched to using butyl tape, the best source being Bed-it Butyl from Compass Marine. The really good thing about this stuff is that it stays flexible forever, so a crack will never form as the boat flexes while underway. Other butyl tapes we tried were just not as good as the Bed-it Butyl.
You can read more about Compass Marine’s suggestions for butyl tape use here.
Marilyn
ModeratorKeymasterI would not recommend going slowly. I did that once, and the wind blew me away promptly. I only escaped disaster by really gunning the engine and getting some speed. I used prop wash to spin the boat to achieve the correct direction.
By “prop wash” I mean, 1) turn the rudder hard over in the direction you want to go. 2) Immediately put the engine in forward and rev the engine. 3) Watch your bow start to swing, and slow the engine and adjust the rudder only after you are going in the correct direction. Keep enough speed to maintain steering control with your rudder.
Of course, you were asking about reversing into a slip. In that case, head in reverse with enough speed for steerage (with a very firm grip on the helm so the rudder doesn’t get slammed over by the water flowing backwards past it). When your reverse direction starts to go wrong, go to forward gear and use prop wash to get your alignment again, and then try reversing again.
Recall the original owners manual says:
Steering Boat in Astern
As a general principle, the stern will tend to pull to Port due to the paddle wheel effect, but in a wind or tide the effect of the propeller is likely to be considerably less strong than the effect on the boat of the wind or the tide. In general it is not worth trying to control the boat accurately in astern without expecting to use ahead gear quite frequently for correction.Another gem from the original manual – which is essentially what I was saying about ‘prop wash’:
Turning at Rest
The Nicholson 38 is very maneuverable in tight circumstances and the procedure for turning the boat in these conditions is as follows. Put the wheel hard over in the direction of turn required and put the boat into hard ahead. As the boat builds up a good swing in this direction, put her hard astern in order to check any headway and to just start her coming astern again. Do not attempt to reverse the wheel while doing this as it will have very little effect and will merely tend to confuse you. As soon as the swing of the bows slows down, go ahead again hard to maintain the swing. Continue to carry out this backwards and forwards motion until headed in the right direction. Always remember, if in doubt, turn away from the wind as the wind will tend to blow the bow off and if the wind is not a major factor, always turn to port if you have a choice.Marilyn
ModeratorKeymasterWing tanks were optional – our boat does not have them. Others do.
You can read some other discussions about these within other postings. Check out:
Marilyn
ModeratorKeymasterI suspect the wire furling genoa you have was added by some previous owner. Our Rainshadow had hank-on headsails when we purchased her in 2009. We added a Harken furler.
We’ve used dyneema in various places, for example the main halyard (because we needed a very small eye splice after our sail was incorrectly built oversize) and as the control lines for our Monitor wind vane. After lessons learned from that latter use, Van decided he did not want dyneema lifelines because of the stretch and chafe. Though dyneema is tough, it is not as tough as stranded wire.
Having said that, I cannot image why a furling line would need to be a tough as wire. If furling is that hard, something is wrong.
Marilyn
ModeratorKeymasterHi Roger –
I think we had the same light originally, and I did find a replacement bulb. It is GE 14555. You can find it available online from various sellers for less than US$10.
As to how to install it, cannot answer that because I think our fixture already lost its gasket, or something. We did the replace the bulb in that fixture once. As I recall, the bulb had to be “glued” in place with some caulk or something. It was all pretty funky and not really waterproof, so it burned out again next season.
Next time you pull the mast down and can do some rewiring, consider whether you want to keep that funky fixture.
We pulled out that deck light, as well as the steaming light and replaced both with a new combo steaming/spreader light – Aqua Signal Series 25 (pn 25404). That uses a 10W festoon for steaming and 20W festoon for deck level. We figured while steaming power consumption is not an issue, and if you want the deck light on, it should be bright – hence we avoided the more power-friendly LED choices.
Marilyn
ModeratorKeymasterI asked Jeremy whether Poppy would have originally had a hardtop. Here is his answer:
The only 38 that never had a G.R.P. canopy was 38/2 PENTANORA now TOPSPIN. I have a photo of POPPY with the canopy in 1988 but Mr Chapman was certainly wanting one in 2005 but it appears that the Halmatic drawing for it was missing, it is only shown in outline on the Sail Plan.
In regards to sailing single handed, I would say our Rainshadow can be single-handed if you trust the autopilot to steer the boat while you go forward to raise the sails. The PO did single-handed her in the protected waters of the Pacific Northwest when the boat still had hank-on headsails. We added a roller furling headsail. However, we have not run mainsail running rigging aft so it still requires going forward to raise/lower/reef the main – and going aft for the mizzen. Having said all that – we have never single-handed Rainshadow because Van and I enjoy sailing together.
Marilyn, moderator
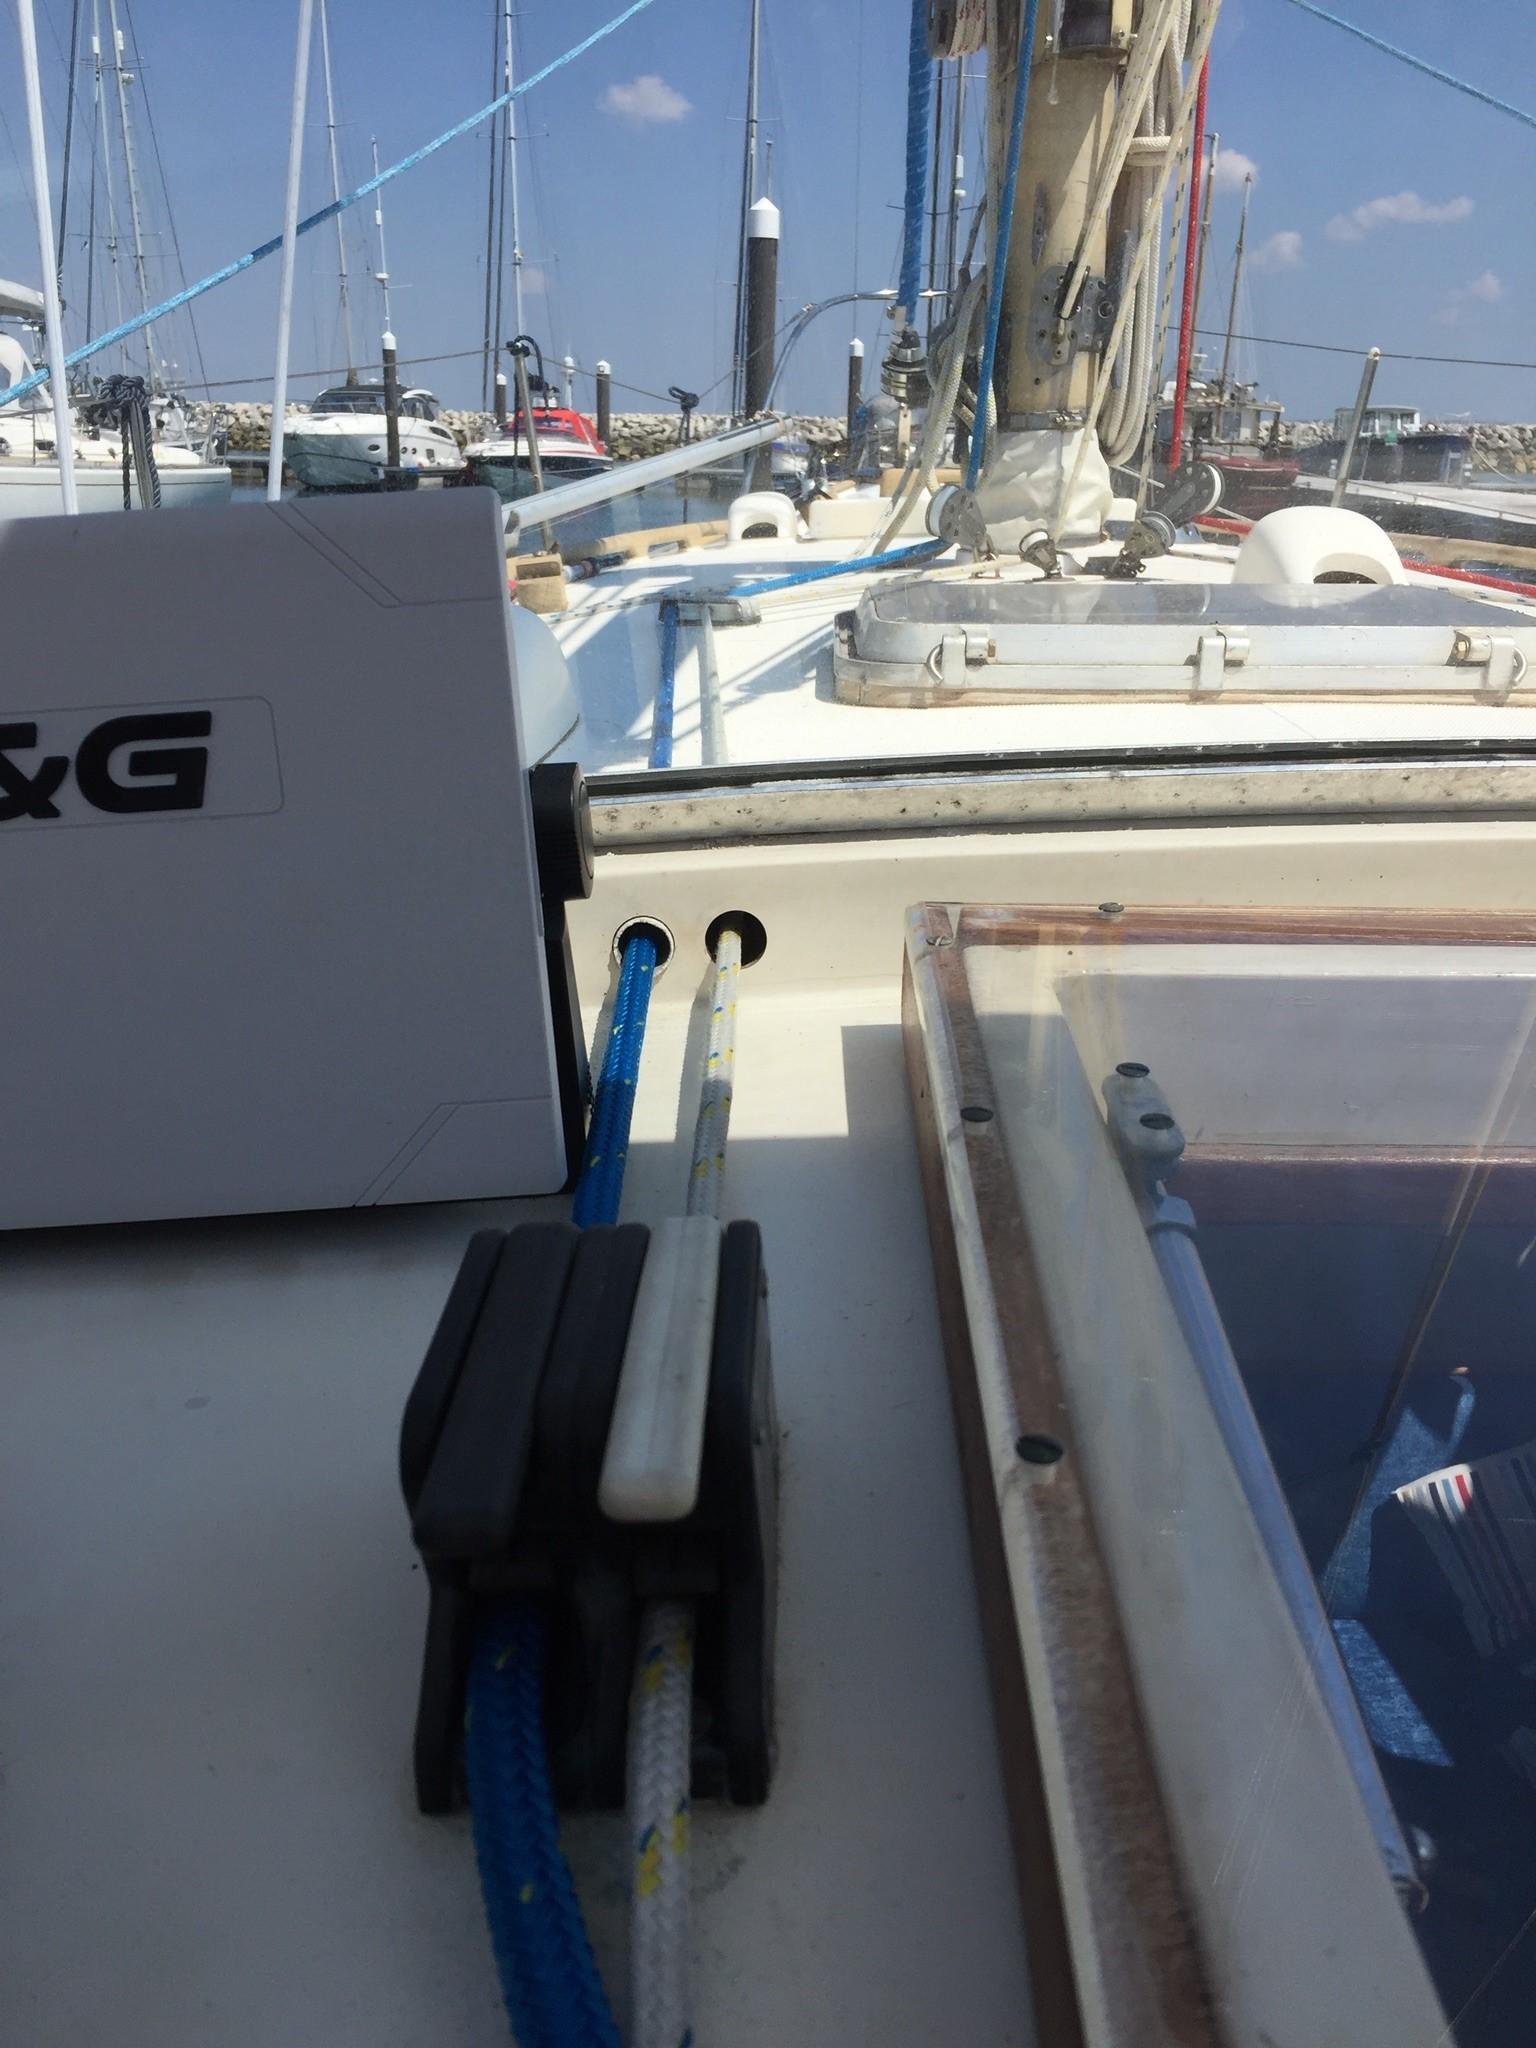
ModeratorKeymasterAlan sent me some photos to show how the lines are lead aft under the windscreen. In his email he says:
As you can see the lines lead to the cockpit through 4 holes drilled beneath the cockpit window . We’ve never had water pass through from either rain or spray from the bow , probably the rope would soak any little water anyway . The lines from left to right are Blue, ( mainsail out haul) Yellow Blue Fleck ( boom vang) Blue Fleck ( main reeling/Furling) Red ( Boom Topping Lift ) hope this helps
Kinda Regards
Alan & Pat



 ModeratorKeymaster
David shared some info with me, and we have determined that Liberty is hull #22, formerly known as KATKOOT.
I have updated the member directory to reflect that.
Marilyn, moderator
ModeratorKeymasterEd and Gil bought a different boat. Their account has been removed from the forum.
Best wishes to Ed and Gil, who purchased a steel hull, pilothouse junk rigged project boat instead.
Marilyn, moderator
ModeratorKeymasterThanks for these photos of Blue Idyl, hull #64.
Does the first picture show the hull with the bottom paint stripped? If so, was it obvious the osmosis was so bad when there was bottom paint on the hull?
Rainshadow, hull #126, has a few minor blisters that are visible through the bottom paint. Every yard so far has said “no big deal, leave it.”
Marilyn, moderator
ModeratorKeymasterFinally been to Rainshadow. Here are some photos I think will help you understand how her helmseat was constructed.
Here’s a view of the bottom side of the seat, with seat post folded down for storage. The legs are also swiveled forward.
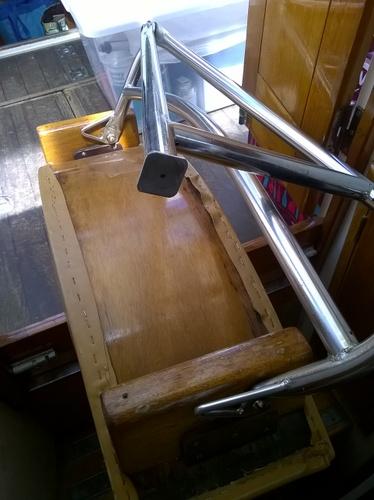
When the leg is not folded and the seat is not swiveled forward, it looks like this:

The seat itself can freely tilt forward a bit so you still have something to lean against when you are standing up. When seated, the top of the seat points upwards. There is a stop so it can only freely rotate forward a little bit. Here is the stop hardware.

The seat width is about 31.5″ (or about 80 cm). The depth of the curve from is about 4″ (or 10 cm). The tape measure in this photo shows inches.

The helm seat is attached on the outboard side by a bracket on the wall with a tab on the outboard seat hardware. Here’s the tab on the seat hardware:

and here is the bracket on the port side cockpit wall, attached to the side of the forward opening locker.

This tape measure (in inches) shows that outboard support leg is about 10.5″ long (or 27 cm).

In the above photo, just left of the tape measure you can see the bottom parts of the inboard support leg, which is attached to the floor. On the forward side, the inboard side leg attaches to the floor with a threaded bolt. That is all the seat had when we bought Rainshadow, and this solution allowed the back portion of the leg to lift off the floor and potentially pinch the deckhands toes if the seated helmsman lead forward. So we added a folding padeye so we can tie the back leg down. Here’s a photo of the flush mounted hardware on the cockpit sole. You also see the latch of the engine hatch on the inboard side for perspective.

Hope that helps. Let me know if you need more photos.
Marilyn
ModeratorKeymasterJoe emailed me to say he is the new owner of Voltair, taking over from John and Robin. Congrats to all!
He says:
I know Voltair has a following so I will try to keep the group abreast of her progress. It won’t be as exciting as before though. This year, apart from moving her up to the Liverpool area will probably be taken up with refitting and maintenance.
Marilyn, moderator
ModeratorKeymasterDuncan – we can take more photos and check the cushion rake angle when we are next on the boat – which might be a week.
I can tell you that there is a vertical slot-type bracket on the side of the cockpit, above and between the locker doors, which allows a tab on the seat to slip into place. This secures the port side. This is all made of hefty stainless steel (SS).
Under the seat is a horizontal SS tubing, same diameter as that visible in the photo. I cannot quite remember how the seat is attached to it. This SS tube has the tab welded to it for mating with the above described bracket.
Photos will help a lot – I’ll make a note to get them next time we head to the harbor (45 min drive).
Marilyn the moderator
-
AuthorPosts