Forum Replies Created
-
AuthorPosts
-
September 12, 2021 at 01:39 #27024
racepassage
ParticipantThanks Guy.
August 28, 2021 at 12:44 #27021racepassage
ParticipantHi Guys
This might help. Have attached extract from a post entered some 17 years ago following an extended cruise. The switch is stylish and will give you 4 additional stanchion caps too!
“One interesting ‘reno’, in Mazatlan, well known for it’s stainless steel trades, replaced the upper lifeline from pushpit to the side gates with 1″s/s rails. Easy to install by removing the plastic stanchion caps and what a difference it makes on the afterdeck on a cold dark night! ”
I have some pictures (if only I knew how to enter) and can always take more
Cheers – Roger
Race Passage
May 18, 2021 at 23:17 #26956racepassage
ParticipantHave you tried this site
Thamesway Marine Products
Pits lane, Chedgrave, Norfolk, NR14 6NQ.Landline: 01508 520 344
Mobile: 07852 520 206Having the gearbox rebuilt in 1996-8(?) due to corrosion I had to visit for parts and found that his workshop is a cowshed at the bottom of his garden. All parts were available.
The only problem was on my return to Vancouver as the customs guy could not understand why I couldn’t have bought the parts in Canada!
Also today found all kinds of Thamesway ‘stuff’ on Google
Cheers-Roger Hull#117
October 4, 2020 at 22:07 #26749racepassage
ParticipantGood day,
On refitting prior to ‘off shore’ installed a Gaurhauer solid boom vang.
Just the job as it does away with the topping lift which I left in case of requiring a lift and having one mainmast winch handy.
Oh-one thing, unsure if available in Europe!
Cheers
July 11, 2019 at 14:02 #26615racepassage
ParticipantGood day All,
Again attempted to replace the forward deck light lamp and again without success.
Firstly unscrewed the 2 top slotted screws which didn’t seem to help at all
Having removed the rubber gasket find that the lamp face is flush with lamp outer cowling and there appears to be no access to obtain leverage to prise out the lamp.
Even though there has to be something like an outer ‘screw on’ ring to hold the lamp in place could not find any joint on the circumference of the cowling.
Where do we go from there??????
Does anyone have any information on the manufacturer’s name.
Any assistance much appreciated.
Roger-RP.
February 12, 2019 at 22:34 #26550racepassage
ParticipantHi Richard
On RP accessible through the floor board on the port side is the toilet though- hull as described by Marilyn. Now on the starb’d side is the Brookes/Gatehouse ‘speedo’ which looks similar to a through- hull (in which it is).
As I have gone over to Simrad single speed/depth transducer, drilling yet another hole through the hull, have temporarily (3 years ago) raised the speedo unit and in some future dry-docking will blank off the outboard aperture flush to the hull.
Would this fitting be similar to yours.
Cheers-Roger.
February 10, 2019 at 19:48 #26545racepassage
ParticipantHi Marilyn,
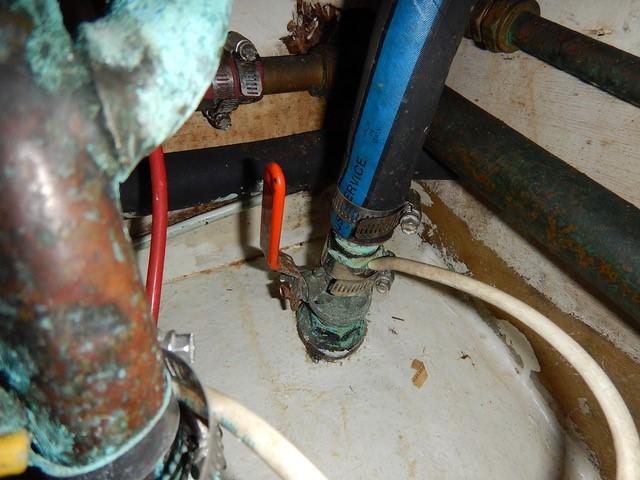
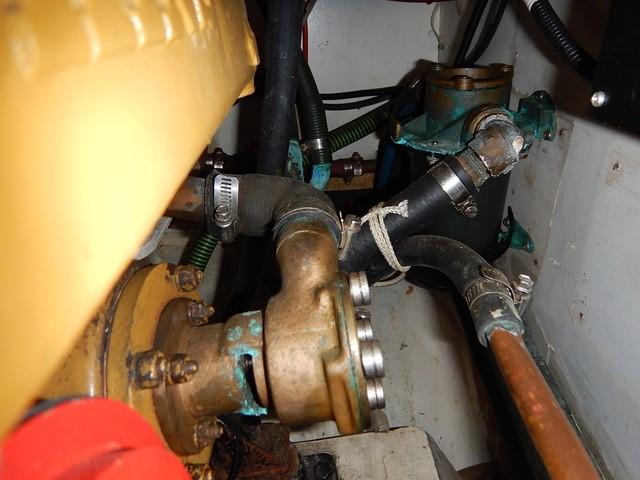
As your access appears difficult and this looks like it might be a dry-docking job anyway have attached pics illustrating the set up on RP.
Have installed typical through hull shut off valve and have the strainer removed and installed on the E/R forward bulkhead more or less just in front of the engine mounted S/W pump. By doing this will allow you easy access to your new strainer through the aperture behind the saloon steps. The hose size throughout, pump to strainer/strainer to through hull, can then be dependent upon the hose attaching to the water pump.
The pictures show better than my explanation.
Just a thought Marilyn.
 January 21, 2019 at 21:39 #26527
racepassage
ParticipantI keep thinking – it must be a dipstick for something. Is it graduated at all?.
Do you have an auxiliary fuel tank under the cockpit port side locker that drains into the main fuel tank? Failing that, do you have a F. W. tank under the starb’d side locker?-R
January 13, 2019 at 23:53 #26512racepassage
ParticipantTo repel boarders possibly – failing that, do you already have a graduated (gallons) wooden dipstick for your fuel tank?
Cheers-Roger. RP.
December 24, 2018 at 22:55 #26506racepassage
ParticipantG’day Joao,
Did just that some 20 years ago.
Assuming the gooseneck has a ‘staghorn’ fitting, part of the original roller reefing.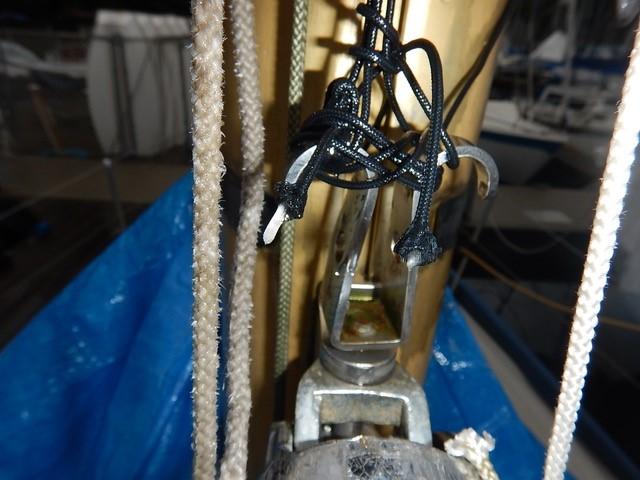
All fittings are on the starboard side (is that because I’m right handed!)
The boom is fitted from fwd to aft, firstly the staghorn top fitting on gooseneck, winch and jamming cleat.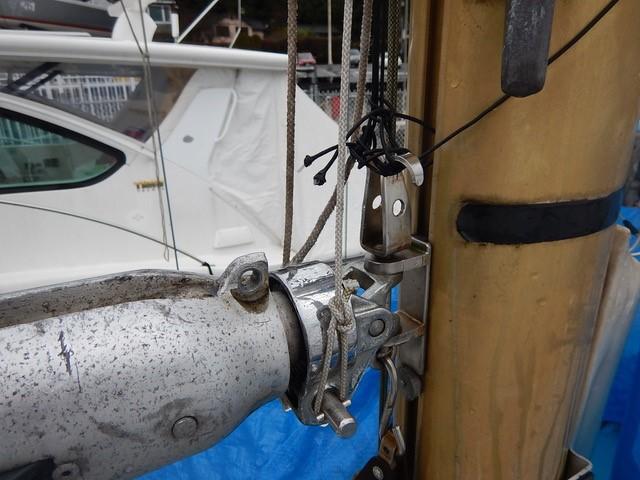
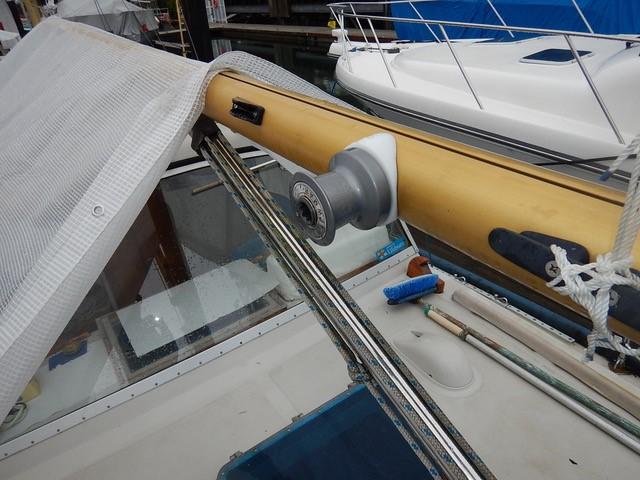
At the after end 2 turning blocks just 45˚ behind sail leach s/s cringles for first and second reef. (I also fitted 2 eyelets at midsection to hold reefing lines against the boom)
Mainsail: Sailmaker/you insert s/s ‘eye’ cringles at both the leach and luff of the sail where the first and second reef will ‘sit’ i. e. Tack/clew, on the boom. The sail should be strengthened in these ‘stress’ areas. Thread some ¾” webbing (about 4”) through the luff cringle (which now becomes the tack when reefed) and sew a s/s ring to each end. Each ring should be of a diameter greater that the cringle.
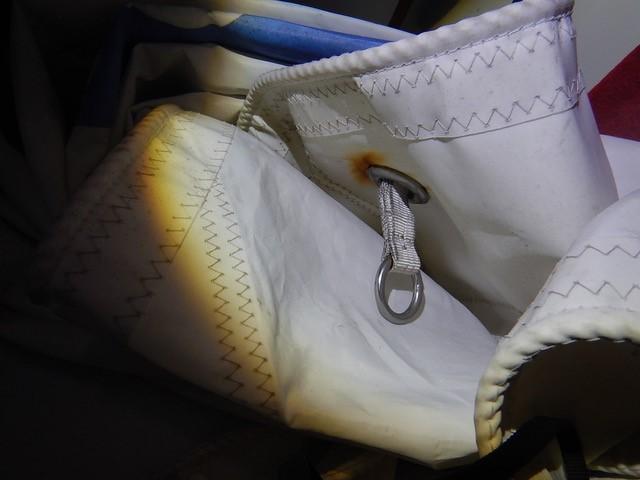
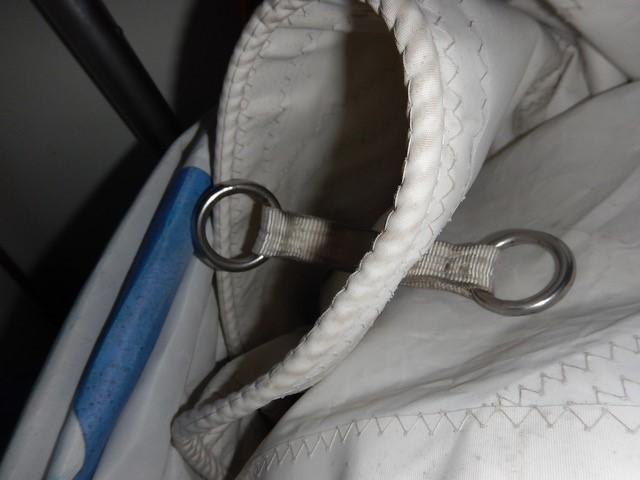
I have the 2 reefing lines secured to the port side of the boom, threaded through the appropriate clew cringle down to the turning blocks. (a 2:1 purchase), through the midship eyelets to either the winch or directly to the jamming cleat.
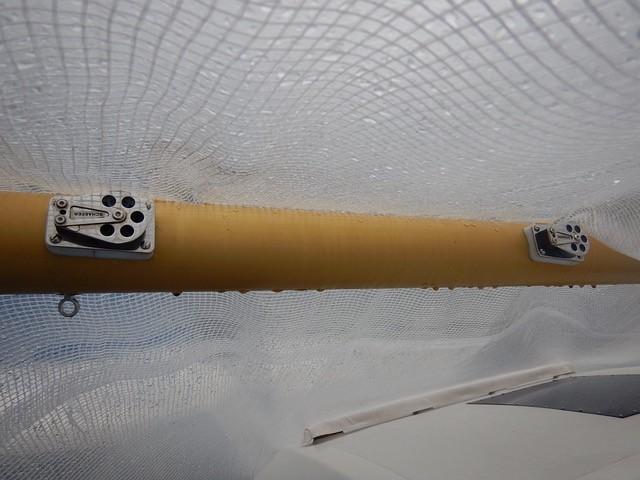
Have also inserted small s/s cringles in the sail (I think 4) between each tack and clew so I can lace up surplus sail when reefed.
In offshore conditions have found reefing easy. Having the benefit of a sold boom vang just slack off the main sheet, slack off the main halyard until able to slide the webbing cringle on to the staghorn hook, tension up the main halyard, pull in the reefing line until clew cringle and boom is ‘2 blocks’, then in with the main sheet and off you go!
Regret some of the terminology may be a little ‘wobbly’, advancing years and all that.
Roger
December 12, 2018 at 22:38 #26500racepassage
ParticipantYes Marilyn,
In 1995 after acquiring Race Passage I was in Gosport and spent an afternoon with Jeremy. He was v. helpful with respect to the boat, supplying drawings etc. Quite a character. As I noticed little work in the yard I inquired if , indeed, did Campers still make small boats. ‘Oh yes’ he replied ‘we launched an 80 footer just the other day’
We will certainly miss his wisdom.
Roger R. P.
December 6, 2018 at 23:49 #26497racepassage
ParticipantHi John,
If, as I understand, you are writing about the greaser pump in the after port side of the engine compartment, if my memory serves me right (I don’t have the book in front of me) the screw top pump pushes grease into the white metal shaft bearing.
I believe the instruction is to give the pump half a turn either before or after using the engine.
Cheers
November 14, 2018 at 19:11 #26483racepassage
ParticipantGood day and welcome Nicholas,
On reading your postscript brought to mind a problem I have struggled with for some time what with advancing years and all that!
The problem is having access and to maintain the Blakes after end WC inlet which on R. P has been coupled up with the saltwater inlet for the galley sink. Now the inlet valve seems impossible to ‘get at’ and in my various attempts have managed to ’round off’ the forward one of the 2 nuts holding the inner flange in place.
I have found that viewing from the engine compartment the valve is too far aft and from the aft cabin floor access the valve is too far forward and now appears inaccessible. My thought now is to cut away the floor in the aft cabin step, in my case where the starter battery is situated!!!!!!!
Has anyone come up with any ideas?
Cheers – Roger. Race Passage.
November 11, 2018 at 17:22 #26480racepassage
ParticipantHi,
If you are writing about the bunk reading light covers just as I did buy a small sheet of clear flexible perspex and cut to suit.
My replacement covers are still good after 22 years. And yes, also changed lamps to LEDs
Roger – Race Passage
September 16, 2017 at 23:49 #26161racepassage
ParticipantRemoved my old tank and had replacement s/s tank fabricated by the CocaCola Plant maintenance shop in La Paz, Mexico (US$ 125.00).
It is installed against the hull behind a longitudinal ‘mini’ bulkhead over the port side of the port side cockpit locker fuel tank and services the after head. (There is still plenty of access to the tank filler cap).
The ‘Y’ valve and hand pump is in and accessed from the forward locker in the aft head with the through deck vacuum discharge hose leading from the tank, through the locker transverse bulkhead to an overhead fitting on deck.
It all seems to work and it’s out of the way.
Cheers
Roger.May 19, 2017 at 13:08 #26081racepassage
ParticipantHi Trevor,
Glad to hear all went well. However, tell me, where does the air vent return hose re-enter the system. I’ve looked and can see no signs of it. Again much of the system is now ‘boxed in’.
Also as I have a holding tank coupled up to the after head in that space over the port side fuel tank only had so much space for the gooseneck.
(By the way – my earlier post read Peter -it should have been Trevor – sorry, put it down to a senior moment!)-RMay 14, 2017 at 22:01 #26076racepassage
ParticipantHi Duncan,
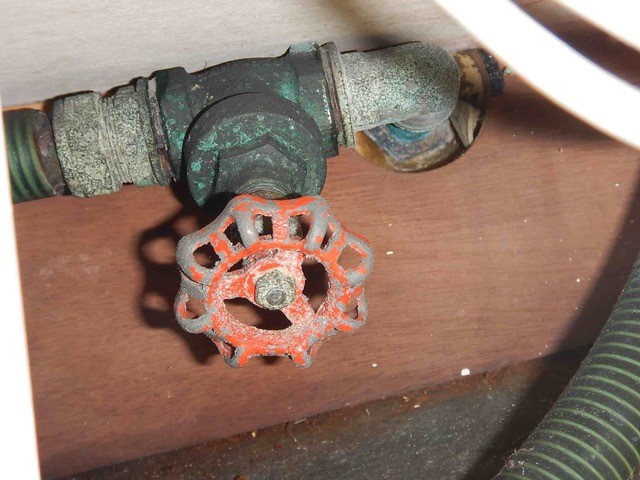
In my search for a air vent return hose (exhaust leak post) looked for the stbd wing tank isolation valve.
Found the stem valve (see pic) under battery box at aft end between after battery box support and after transverse bulkhead.
Only used the wing tank when offshore cruising as inner liner affected by blisters and, after a while, the water had a ‘funny’ taste.I didn’t grow horns though so used the water as a last resort.
The boat is No. 117 fitted out for West Coast Canadian owner so if you don’t have a valve this may be a factor.
Good hunting-Roger.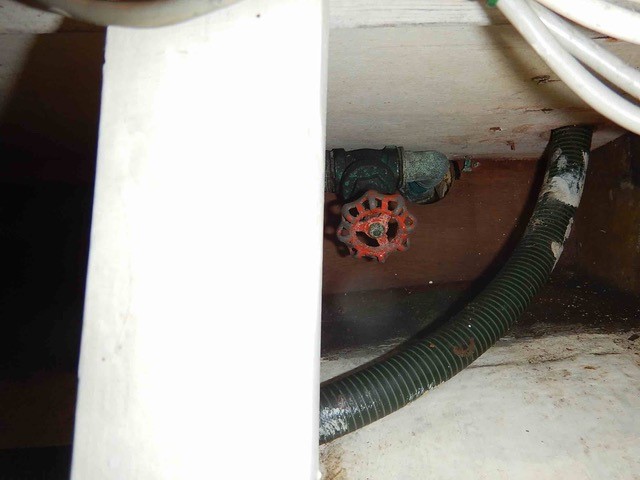
 May 11, 2017 at 20:12 #26066
racepassage
ParticipantG’day Peter,
Regret the late response as notwithstanding visits to the boat, review of Vetus Catalogue (now misplaced) and discussions with my engineering colleague (who ordered the parts) unsure of where the air vent return pipe re-enters the system.
As seen in the pics the exit fitting on the engine exhaust manifold was modified to incorporate a spigot with attached hose to the air vent inlet.As the piping is now ‘boxed in’ now unsure of where the air vent return pipe re-enters the system but will continue to search.As I installed the entire system it can’t be difficult but due to advancing years now forgotten. I’m sure your Vetus dealer (we don’t have one in Canada now) can advise.A temperature alarm sensor was installed in the main exhaust pipe from manifold to waterlock (see pic) with alarm installed in steering column.
The gooseneck fitting has inlet attachments at top and exit conveniently at the base. The main exhaust pipe from the transom entered the compartment just outboard of the steering shaft.(see prev. pics.) Cutting off excess pipe, secured the pipe to the gooseneck base and secured the exit pipe from waterlock to the top then installed the gooseneck to transverse bulkhead with generic brackets.
The waterlock sits on and is secured (2 tie straps supplied) to am aluminium bracket screwed to transverse bulkhead.I had to move the stern tube grease ‘gun’ inboard slightly.
The air vent through-hull pipe was lead aft into the aft head and skin fitting installed approx. 1′ – 2′ aft of the gate.
Hope this helps
Cheers-Roger.January 29, 2017 at 23:09 #26022racepassage
ParticipantFor the interest of those who are contemplating renewing their exhaust system here are the Vetus part numbers including hose lengths etc.
Qty Item No Description Per Unit1 91-717 Waterlock 1 5/8”, Plastic, NLP40 EA
1 91-739 Gooseneck 1 5/8”, Plastic, LT40 EA
1 91-378 Alarm, Exhaust Temp. Dashboard 12V Black EA
6 91-493 Hose, Exhaust, 1 5/8” Rubber FT
1 91-436 Airvent W/4MTRS Hose & Skin Fitting EA
1 91-380 Sensor for Exhaust Temperature Alarm
Cheers-Roger.
January 23, 2017 at 00:21 #26009racepassage
ParticipantHi Folks,About 2 years ago pulled out entire engine compartment exhaust system and installed a Vetus system. that is, from the engine manifold exhaust is piped to a Vetus simple mixer (water lock) then up to the Vetus gooseneck attaching to the existing exhaust pipe through to the transom. A simple Vetus air vent is also included which exits through the hull at cove stripe level (port side) just behind the side gate. It means that when at the wheel I can easily see the thin stream of S. W. coolant flowing out. If it stops then I know there is no S.Water intake!!!
The installation was easy, all Vetus parts and hose fit perfectly, so no worries.
Will attempt to enter pictures.June 26, 2012 at 22:02 #11831racepassage
ParticipantHi Marilyn,
I installed a Speedseal’ pump cover. dead easy now-Roger R.P.December 28, 2011 at 23:48 #10841racepassage
ParticipantHi Adrian, give me yr email address and will send pics-Roger Race Passage
December 17, 2011 at 01:13 #10801racepassage
ParticipantPrior to cruising installed a ‘solent’ stay. Put an eye bolt on the mast head appro. 12″ below the mast head sheaves to accept the upper stay, and at the deck (I hate drilling holes in the boat) removed the 2 after bolts from the centre staghorn ‘bitts’ and fashoned a ‘U’ bolt which replaced the previous bolts and which allowed an ‘eye’ to pick up the lower attachment for the stay.
To beef up the underdeck I glassed in to the inner stem an angled mini bulkhead sufficient to attach a turnbuckle which in turn attached to the underside of the “U’ bolt protrusions at the deckhead. I have pics. if anyone is interested-Race Passage.December 1, 2011 at 18:19 #10541racepassage
ParticipantHi Marilyn,
The con rod is a stock chevy!! part. I replaced mine 10 yrs ago and the part is easily obtainable.-Regards-RogerNovember 17, 2011 at 22:29 #10321racepassage
ParticipantHi Marilyn, In 2000 installed entire Simrad s.s unit. Expensive but good. Roger Race Passage.
-
AuthorPosts