Forum Replies Created
-
AuthorPosts
-
July 18, 2022 at 01:49 #26660
Ollie Holden
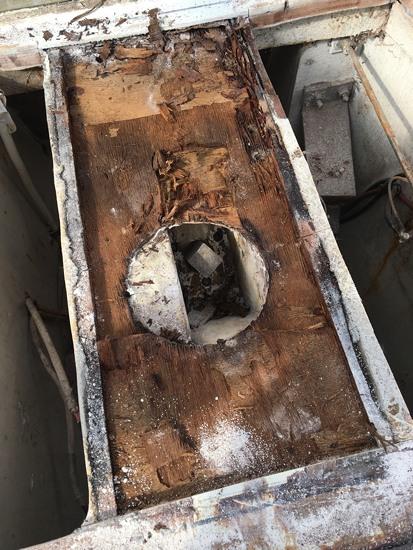
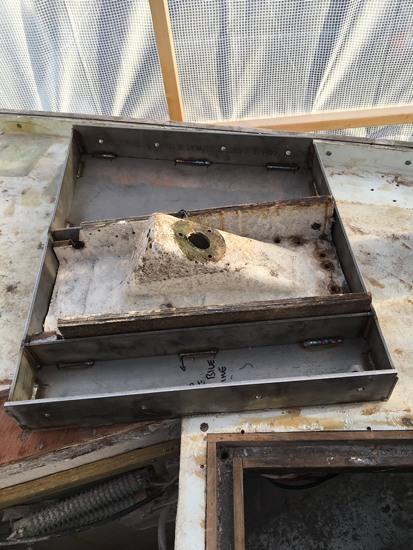
ParticipantHere was my solution – a big job undertaken as part of replacing the teak deck. We found that the ply under the mast was rotten, so built a stainless steel frame to fit between the two longitudinal bulkheads. This was bolted between the bulkheads and then glassed over to form the camber on the deck. We re-attached the original upper fibreglass moulding for the upper end of the rudder shaft to the stainless frame. It could survive a direct hit from a ballistic missile now I think.


 January 12, 2020 at 08:52 #26658
Ollie Holden
ParticipantI have replaced all vinyl on both bulkheads and headlining – I am happy to answer any questions on it. It makes a big difference to the feel of the boat.
January 12, 2020 at 08:41 #26657Ollie Holden
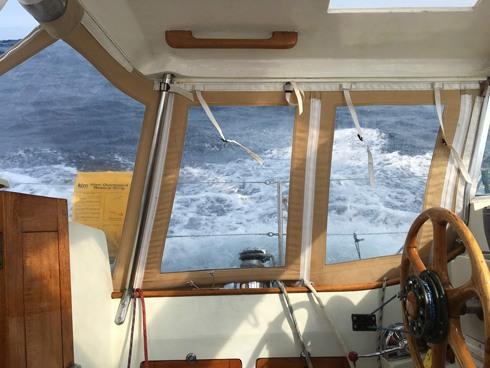
ParticipantI looked through my photos and bizarrely don’t have any of Nutmeg’s Aries setup. The below is the best I could find; this shows how the lines come through the coaming to the drum. The drum has a screw-in dog that locks with the wheel; I found that it could unscrew itself and disconnect at inopportune moments, so I added some elastic bungee over it to add some friction. I refitted the Aries for the AZAB; it was absolutely superb.
 March 28, 2018 at 07:25 #26267
Ollie Holden
ParticipantHi – I put in 50mm soundproofing material and held it in place with Long pan head screws with penny washers. It has held absolutely fine for the last nine or so years. I can’t recall where I got the sound proofing material but it was quite expensive as it has multiple layers and is silver-faced.
December 27, 2017 at 21:50 #26206Ollie Holden
ParticipantI’ve always gone for pretty loose on the mizzenmast, on the basis that there is no hanked sail which requires significant tension to maintain sail shape. The original mizzenmast mast is built like a tree trunk so you’d do well to pull it out of column.
The base of the mizzenmast is not the best piece of engineering, and I would encourage you to check that the main backstay is sufficiently anchored. Mine was just through bolted with four bolts but no backing plate. I am in the process of replacing the entire deck with a significant stainless structure to take the compression and tension loads.
https://photos.app.goo.gl/7yZseHGzTB87HsSD2December 27, 2017 at 21:43 #26205Ollie Holden
ParticipantHi – not sure how to post photos. Try this link which should take you to the refit album. https://photos.app.goo.gl/f5ddTsscpPlJzuhr1
November 25, 2017 at 22:08 #26183Ollie Holden
ParticipantUpdate on the teak decks. Wasn’t too bad a job to chisel off the old teak, and I found what I expected – the grp deck had lifted in places. When I dig into the grp i found the culprit – the aluminium pads that were bonded into the deck as backing pads for all the major deck fittings (cleats, stanchions, Genoa tracks etc). All these had corroded where the stainless bolts had let water through over the last 45 years, and the resulting aluminium oxide had expanded and pushed up the grp. Not unexpected, so I cut all the pads out, and have filled the resulting voids with layers of biaxial cloth with epoxy. A lot of work to bring back up to a flat level. We’ve then sheathed the entire deck with three layers of biaxial cloth, as there are a few areas where the deck flexes when someone heavy stands on it.
The other major job whilst the teak was off was to sort the aft deck. We had the usual sag under the Mizzen mast so I cut the entire deck out between the two fore and aft bulkheads. The ply sandwich was rotten hence the sagging. I have had a stainless steel “tray” fabricated which is bolted between the bulkheads and provides compression strength for the Mizzen, and lateral support for the rudder stock. I can send photos if anyone’s interested.
I also removed the anchor well and filled with 1” marine ply epoxied into place. We have a Delta 20kg on the stem head and never used the anchormwell, plus it cuts into the fore peak space.
I’ve had to do a fair amount of filling of the pads under the deck, so there is a sound base for all fittings to bolt onto when I get to re fit everything.
The teak has arrived (after lots of chasing quotes ive eventually got it from Robbins Timber – not cheap but it comes fully finished and they are a quality timber merchant) so hopefully we can start laying in the coming weeks – we have a tent, light and a heater.
I stripped the teak in September so it has taken a couple of months to prep. A big refit but hopefully will last a few decades.
Whilst the boat is in bits, I’ve also taken the opportunity to do a bit of work inside. I’ve glassed in a small bulkhead just behind the mast step as the main saloon bulkhead doesn’t extend right down to the base of the mast, and there has been a small amount of movement here in the past. Also fitting a holding tank in starboard forepeak, removed water heater in galley (and subsequently redone all freshwater plumbing), and fitted a locker under the starboard forepeak for the windlass battery. If anyone would like more details or photos, please shout. Nutmeg is in Wilsons Boatyard on Hayling Island, you’re welcome to come and visit.
August 14, 2017 at 07:15 #26137Ollie Holden
ParticipantHi – none of the stripdown has been particularly difficult so far, but I’d ascribe that to this being my second refit of Nutmeg, so I’m a bit more familiar with how things are put together/come apart.
Re: the fridge – I took the front panel off (just screwed on) and from here you can slide the top of the fridge unit out. I had bolted the refrigeration plate to this, so I needed to slide it out with care, to avoid bending the refrigerant hoses. From here, I think I can access the one stanchion base. When I replaced the chainplates ten years ago, I made a little inspection hatch to access the aft port plate, which can be accessed from the cupboard fwd of the fridge.
Re: the winch bases – I’ve taken the winches off still attached to the bridge. I managed to get to the bolts with a combination of socket set and spanners. Since doing this, I invested in a set of stubby spanners as I think these might help. They are bolted on with three bolts through the deck, and two bolts into the coaming, with an aluminium backing plate.
I am working from the aft deck forward. I’ve found a reasonable amount of soggy plywood under the mizzen mast mount which will need dealing with. I’ve also got a lot of white powdery substance coming out of the holes when I took one of the cleats off – I suspect the aluminium plate has corroded. Not sure yet whether I will try to remove/re-bed – will decide when I’ve removed the teak deck.
I will take a load of photos and post a link.
August 4, 2017 at 10:46 #26125Ollie Holden
ParticipantThankyou for your replies. I’m in contact with the race organisers who are trying to find any information on precedents. I can’t be the first old boat to try and enter a race like this! WIll keep you informed
June 12, 2017 at 09:35 #26084Ollie Holden
ParticipantApologies for being late to this thread. We had an Aries fitted to Nutmeg for our Atlantic circuit in 2008/09; I’ve now taken it off and it is in the garage awaiting the next adventure. I will try and dig some pics out, but basically I ran two dyneema lines via ballrace blocks from the Aries back to the wheel. They came through the coaming side using Harken through-deck blocks.
Because of the friction and line stretch, plus all the mechanical linkages in the steering itself, it isn’t as responsive as I’d like, and I considered attaching it to the emergency tiller, just to take a load of linkages out (but I didn’t). And indeed we had some challenges with the blade of the Aries popping up (a different issue with the sleeve, which I dont think all versions have).
Happy to answer any questions you may have.
Ollie Holden
Nutmeg of ShorehamApril 11, 2013 at 21:33 #7191Ollie Holden
ParticipantSteve,
Many thanks for the quick response – ironic that our boats are both having new masts from the same rigger within a few months of each other! They have said that I need a new mast so suspect we will be getting a double spreader Selden mast like I think you’ve got. Would appreciate any tips or pitfalls to look out for with the new mast. Cheers, Ollie
March 12, 2013 at 10:01 #13271Ollie Holden
ParticipantWe pulled all ours and found some significant crevice corrosion in the lowers. I had a complete set of new chain plates made up by a local stainless metal works. They were a pain to get to but I had taken the heads moulding out and the port lockers anyway. Afterwards I created a little inspection “door” so I can check them regularly. Crevice corrosion is quite frightening – one snapped off when I was trying to unscrew the nut.
March 12, 2013 at 09:50 #13261Ollie Holden
ParticipantI did similar, I put Lewmar 46 ST winches on and they have been faultless.
March 12, 2013 at 09:48 #13251Ollie Holden
ParticipantHmm – then I suspect it wasn’t your boat as it was heading East on the motorway and south out of Chi harbour! Maybe we’ll never know who it was..
March 1, 2013 at 20:27 #13191Ollie Holden
ParticipantDid I see you heading out of Chichester harbour today, without masts? Where are you heading?
December 9, 2012 at 19:35 #12741Ollie Holden
ParticipantApologies for the lack of postings. “Nutmeg” is having her rudder done at the moment, a job I’d wanted to have done since I’d bought the boat, but never got to the top of the list! There has always been a little movement between stock and blade but despite worrying about it over 2 Transats we’ve had no issues whatsoever. However I knew it had water inside. I will post some photos once I’ve seen what it all looks like.
It was a real pain to get out as the mild steel sleeve which joins the stock together was absolutely solid and needed to be cut off. Then the prop and shaft needed to come out, and the boat lifted off its cradle to get the rudder off – all good fun…
January 14, 2011 at 15:32 #8371Ollie Holden
ParticipantHi,
I have some from when I re-did the windows on Nutmeg. You can buy them from places like http://www.a2a4.co.uk and http://www.seascrew.co.uk. One part was A2 the other A4 stainless – I never found all in A4 unfortunately, but they seem to be holding out OK.
If you only need a few, let me know how many you need and I’ll grab some from the spares box when I’m next on the boat.
Cheers
Ollie
October 21, 2010 at 07:53 #7711Ollie Holden
ParticipantOn the original masts, there was a thin galvanised wire running up the mast for exactly this purpose. But chances are it’s rusted away.
The inside of the mast has polystyrene stuck to the sides (for sound deadening/flotation) and this can make it tricky to drop a line down from the top.
That, plus the fact that it’s keel-stepped (so the person at the bottom is inside the boat and can’t hear the man at the top of the mast) means it is hard to send a line down via gravity.
I took the masts out, which was only a couple of hundred quid, and was able to do a proper check of everything. I also found that there was a fair amount of corrosion around the base – not enough to be a structural issue but enough that once I’d knocked the heel off, I decided to saw 10mm off the base of the mast, filed it flat and replaced the heel. I happened to be replacing all the rigging anyway, so I got it all made 10mm shorter, but you could probably compensate by winding the existing rigging screws.
Sorry, I digress. I used a chimney sweep set (about £15 from B&Q) to push the messenger line up. I took the stainless top off the mast also as I found a small crack on a weld and sent it off to be strengthened, so the whole thing was very straightforward as you’re just pushing through a tube. I replaced all wires with tinned, and left a messenger line in, just in case (although I still think it would be hard to do this with the masts in situ).
-
AuthorPosts